Table of Contents
Surface Creation in BeeGraphy: Loft, Extrude, and Sweep Techniques
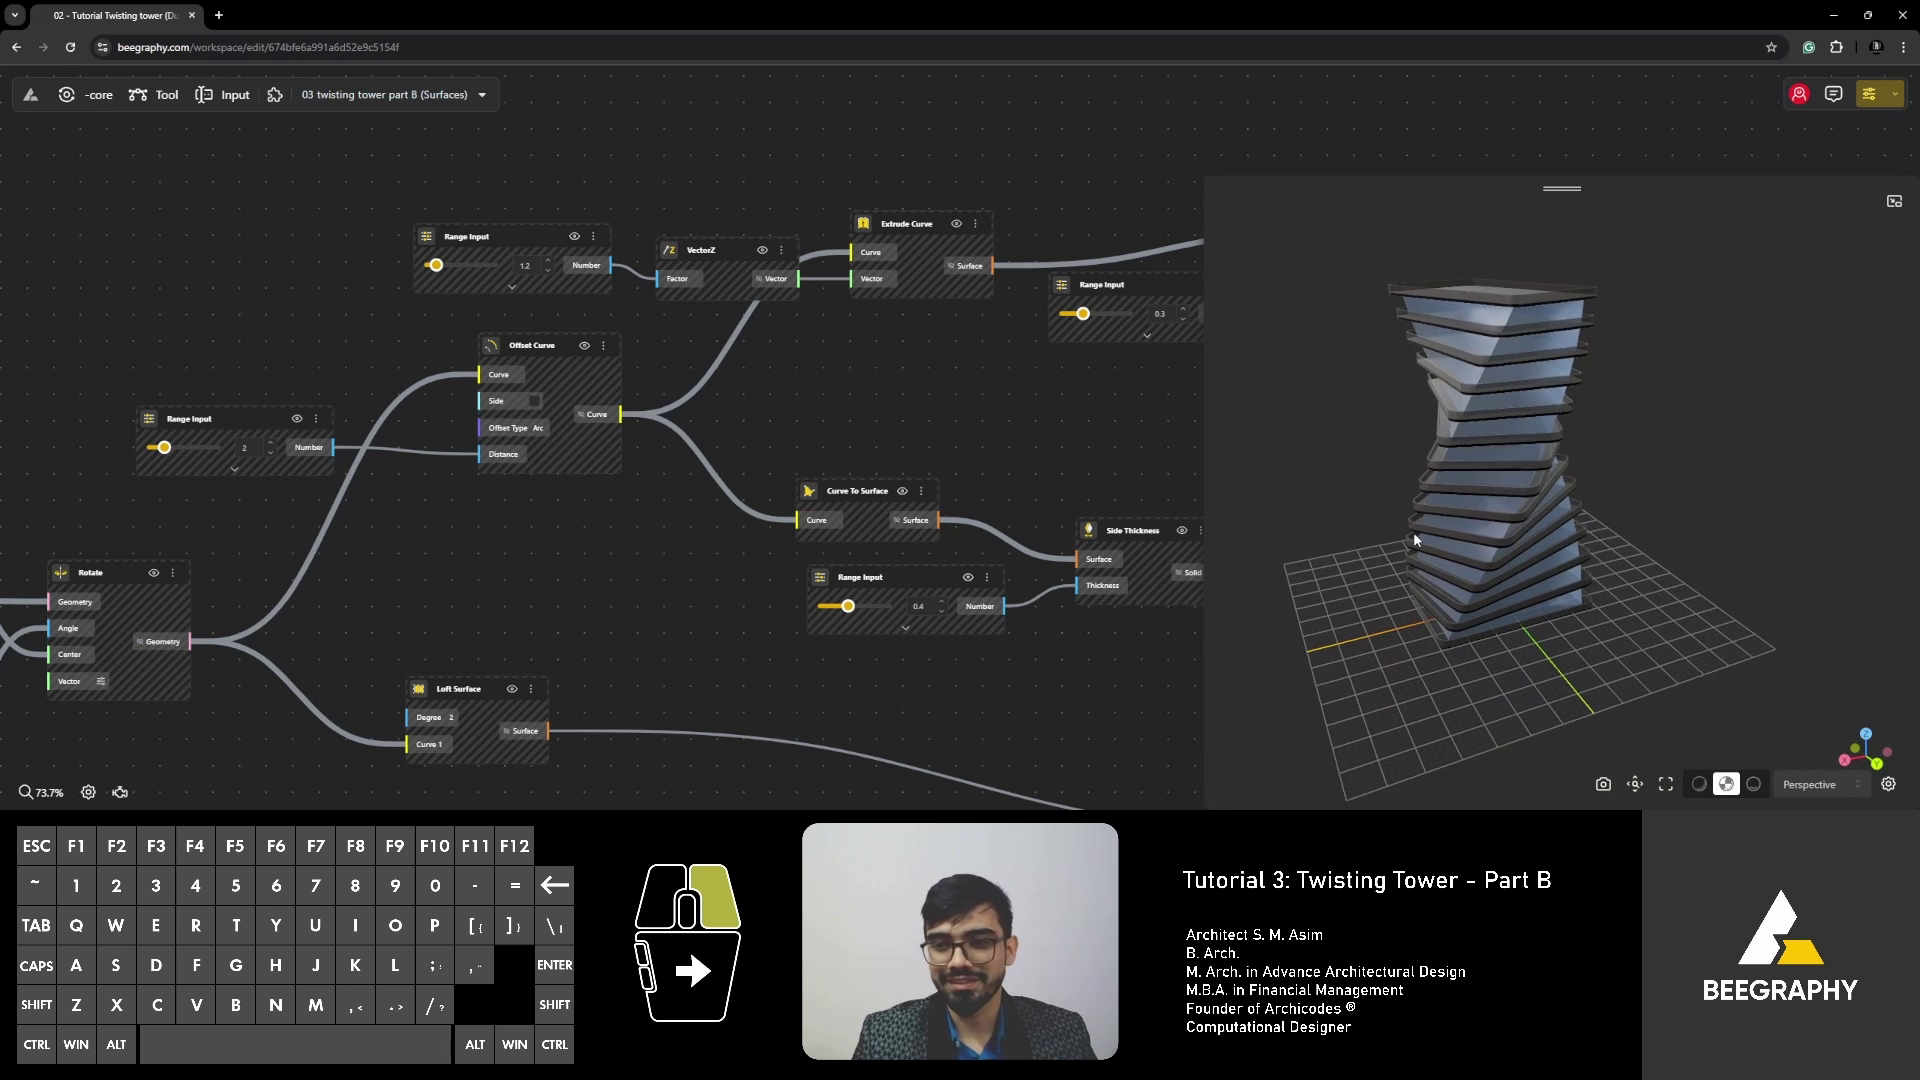
Surface creation is a cornerstone of architectural and product design, enabling creators to bring complex, functional, and aesthetic ideas to life. In BeeGraphy, this process is both intuitive and powerful, thanks to its suite of parametric design tools. These tools—Loft, Extrude, and Sweep—allow designers to craft intricate surfaces and experiment with forms in ways traditional methods simply can’t replicate.
This comprehensive guide explores the core techniques for surface creation in BeeGraphy, taking you step-by-step through the tools and methods needed to create innovative, dynamic designs. By the end of this tutorial, you’ll have a solid grasp of surface creation principles and be ready to integrate these techniques into your projects.
The Power of Parametric Design
Parametric design has redefined the boundaries of creativity. Instead of static modeling, parametric design enables designers to adjust parameters and see changes in real-time. This iterative process fosters experimentation and adaptability, which are crucial for achieving groundbreaking designs.
BeeGraphy excels in this arena by providing an accessible, cloud-based parametric design platform. Its collaborative environment empowers users to work together in real-time, share projects effortlessly, and protect intellectual property through secure workflows.
Surface creation is one of the many ways BeeGraphy showcases the power of parametric design. The tools you’ll explore here—Loft, Extrude, and Sweep—form the foundation for crafting everything from simple surfaces to complex geometries.
BeeGraphy’s Surface Creation Tools: An Overview
BeeGraphy’s surface creation tools stand out for their precision and flexibility. They cater to a wide range of design needs, from creating basic planar surfaces to constructing intricate, organic forms. Here’s a quick look at the tools we’ll be exploring in depth:
- Loft: Ideal for connecting multiple curves to create seamless, flowing surfaces.
- Extrude: The go-to tool for stretching shapes into three-dimensional forms.
- Sweep: Perfect for creating surfaces that follow dynamic, complex paths.
These tools form a cohesive workflow that adapts to both beginner and advanced design challenges.
Curve to Surface: Building the Foundation
At the heart of surface creation is the ability to generate surfaces from curves. BeeGraphy’s “Curve to Surface” tool makes this process straightforward, whether you’re working with basic shapes like rectangles and circles or custom-drawn curves.
Closed Curves: Circles and Rectangles
Closed curves are foundational elements in surface creation. Shapes like circles and rectangles provide a base for generating surfaces, which can then be manipulated further.
Practical Application: Use the “Curve to Surface” tool to transform closed curves into surfaces. For example, inputting a rectangle generates a planar surface, while a circle creates a rounded, disk-like surface.
Troubleshooting Common Issues
One common challenge arises when curves aren’t fully closed. If your surface doesn’t generate correctly, double-check that your shape forms a complete loop, such as a fully connected rectangle or circle.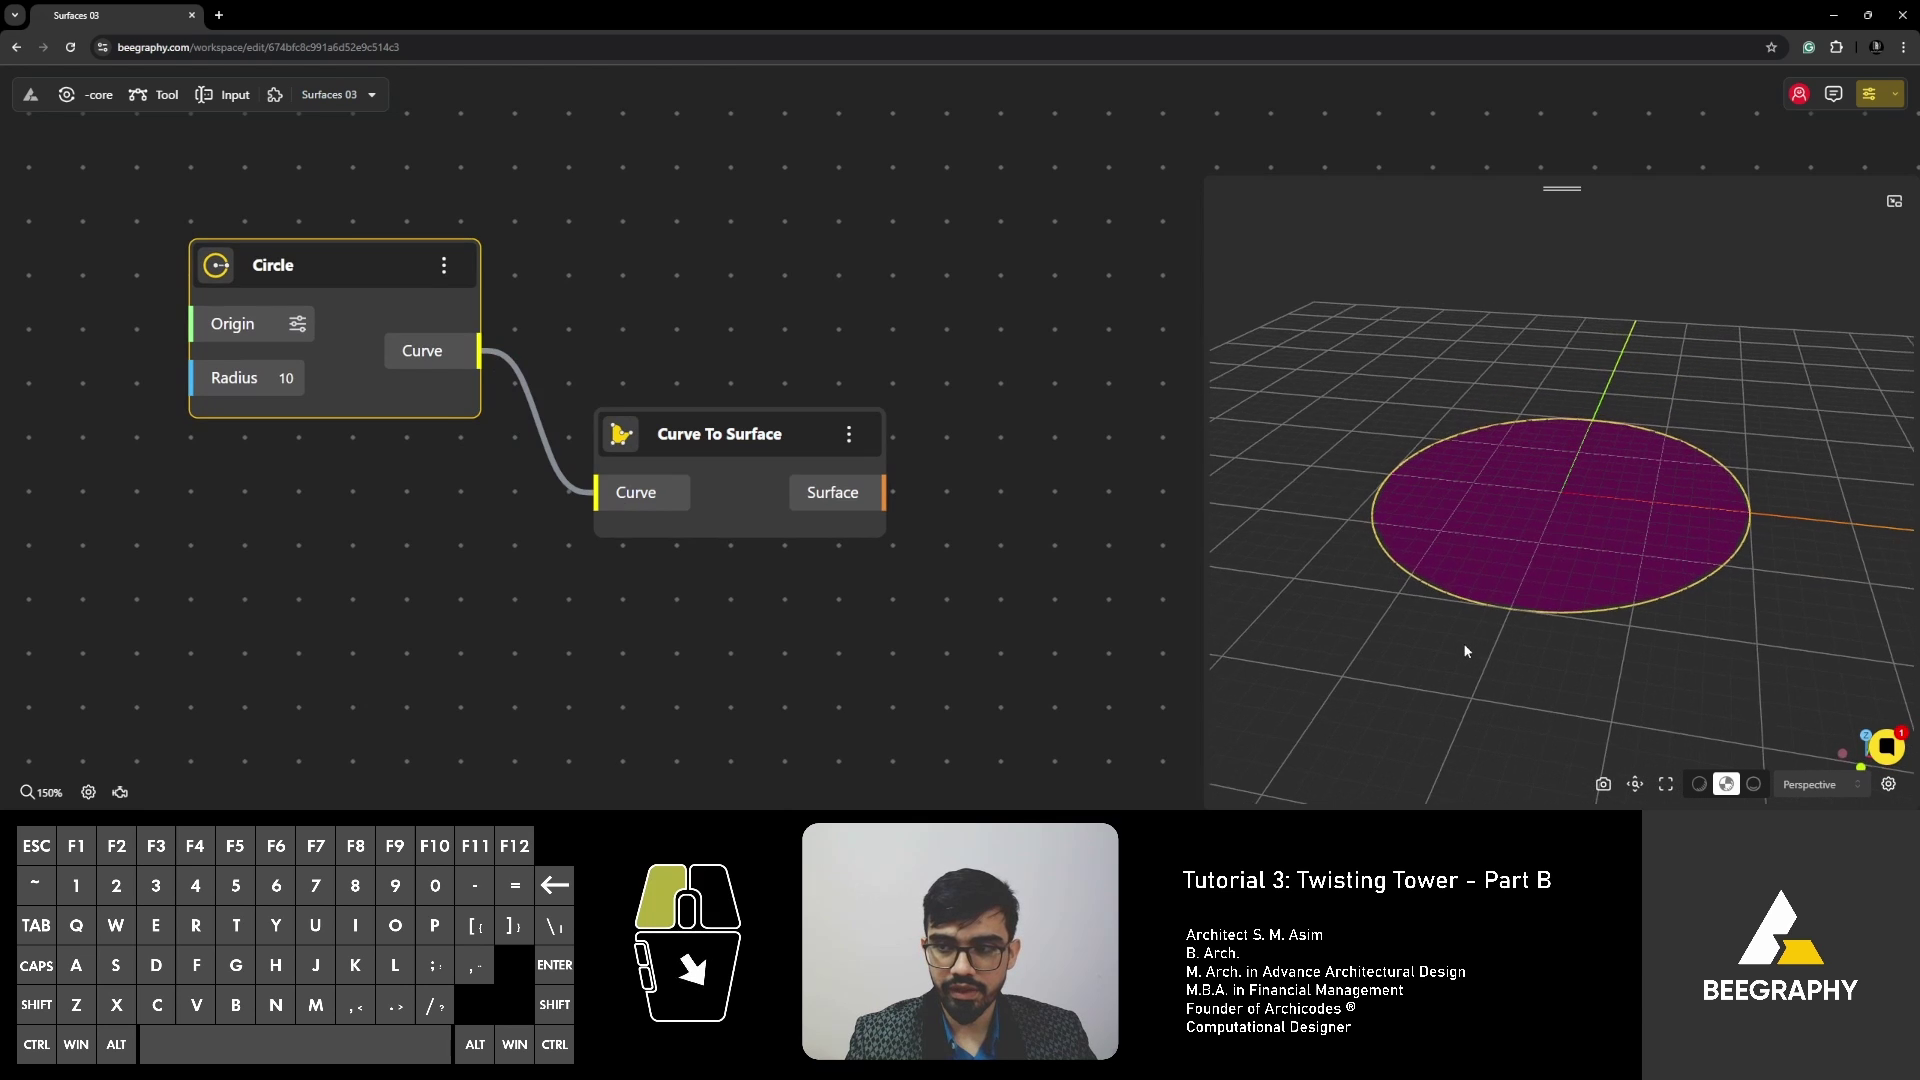
Extrude: Creating Simple, Parallel Surfaces
Extrusion is one of the most versatile tools for creating three-dimensional forms. By stretching a 2D curve into a 3D shape, extrusion allows you to add depth and volume to your designs.
Understanding Extrusion Basics
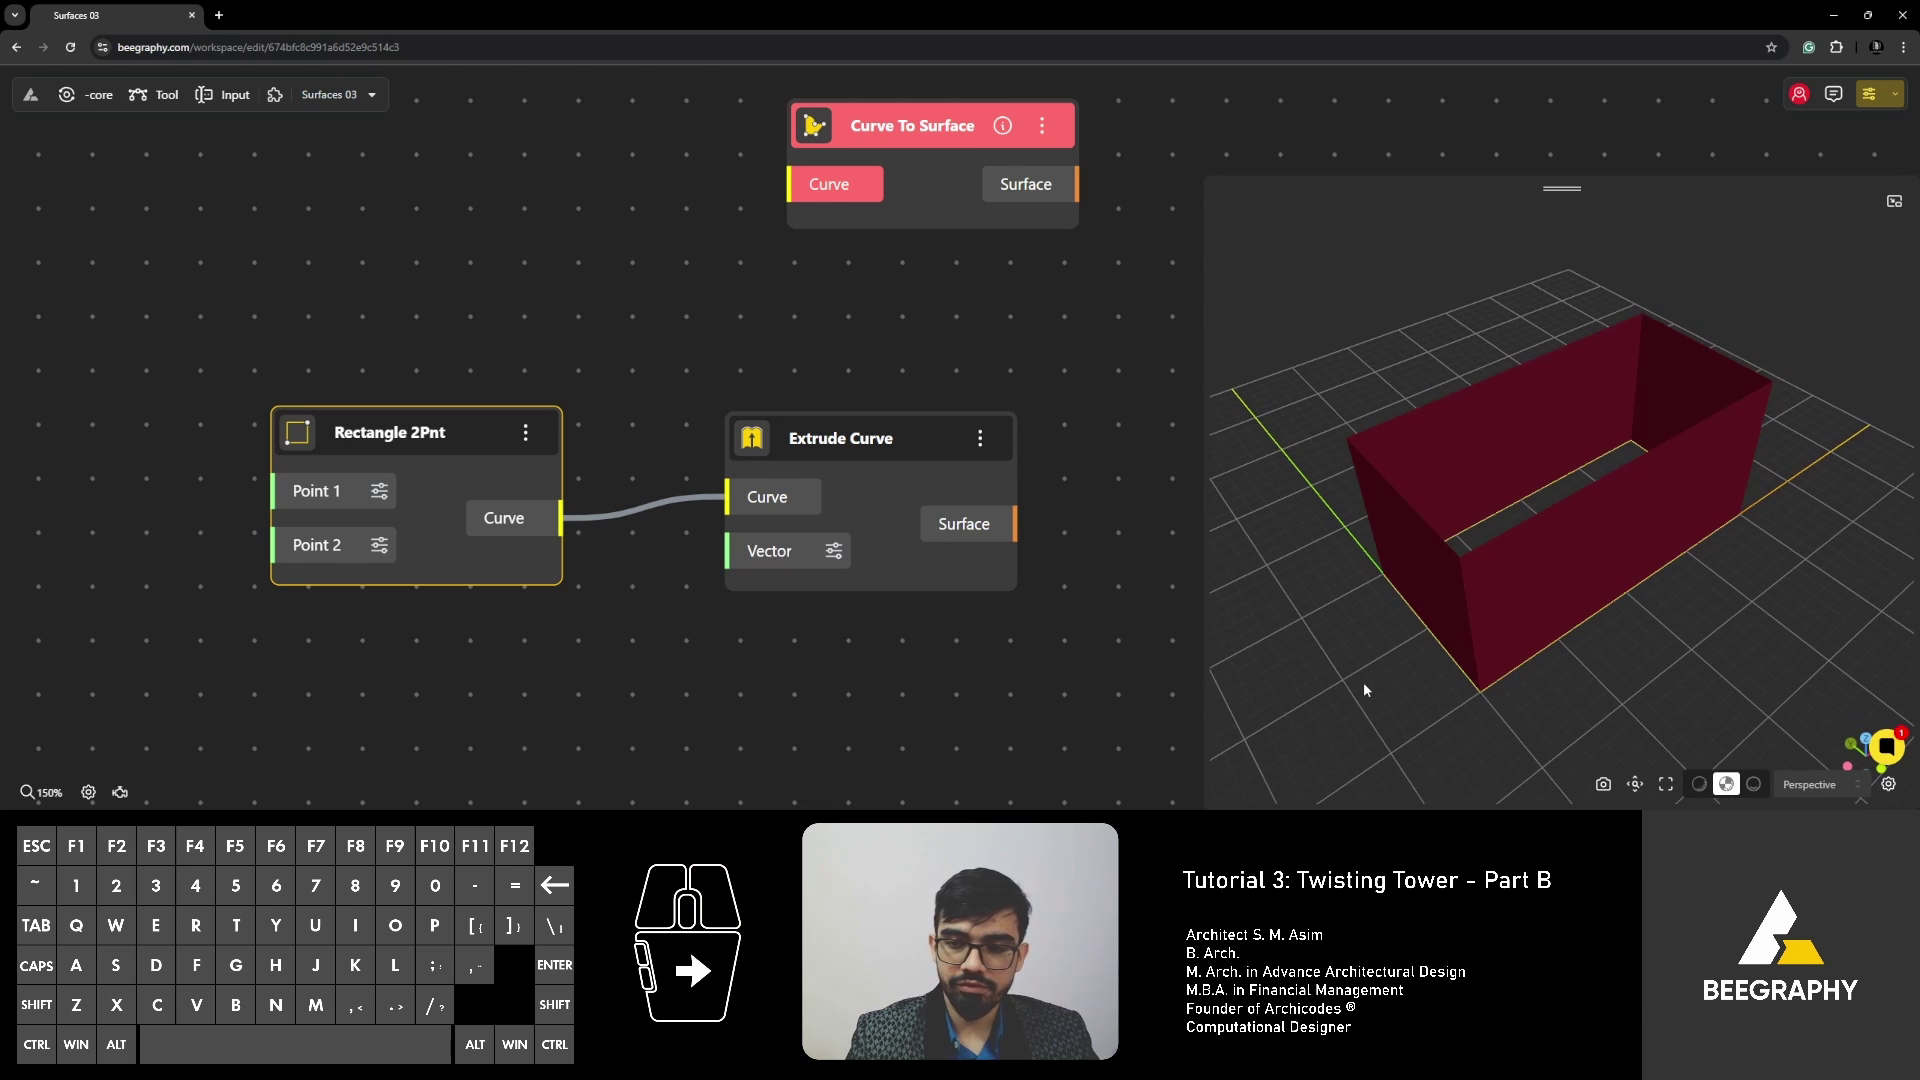
Extrusion creates surfaces by pushing or pulling a 2D shape along a specified vector. The result is a parallel-sided surface, ideal for creating foundational elements like walls, columns, and boxes.
Controlling Extrusion Parameters
The key to mastering extrusion lies in controlling its parameters:
- Vector: Determines the direction and magnitude of the extrusion. For instance, a vector pointing upward in the Z direction creates vertical surfaces.
- Height: Adjust the vector’s magnitude to control the height of your extrusion. A vector of 10 units creates a surface 10 units tall.
Practical Application: Elevating Your Designs
Extrude a rectangle vertically to create a wall or upward-facing plane. Adjusting parameters like height and direction allows you to explore creative variations, such as angled surfaces or stacked elements.
Sweep: Following Complex Paths
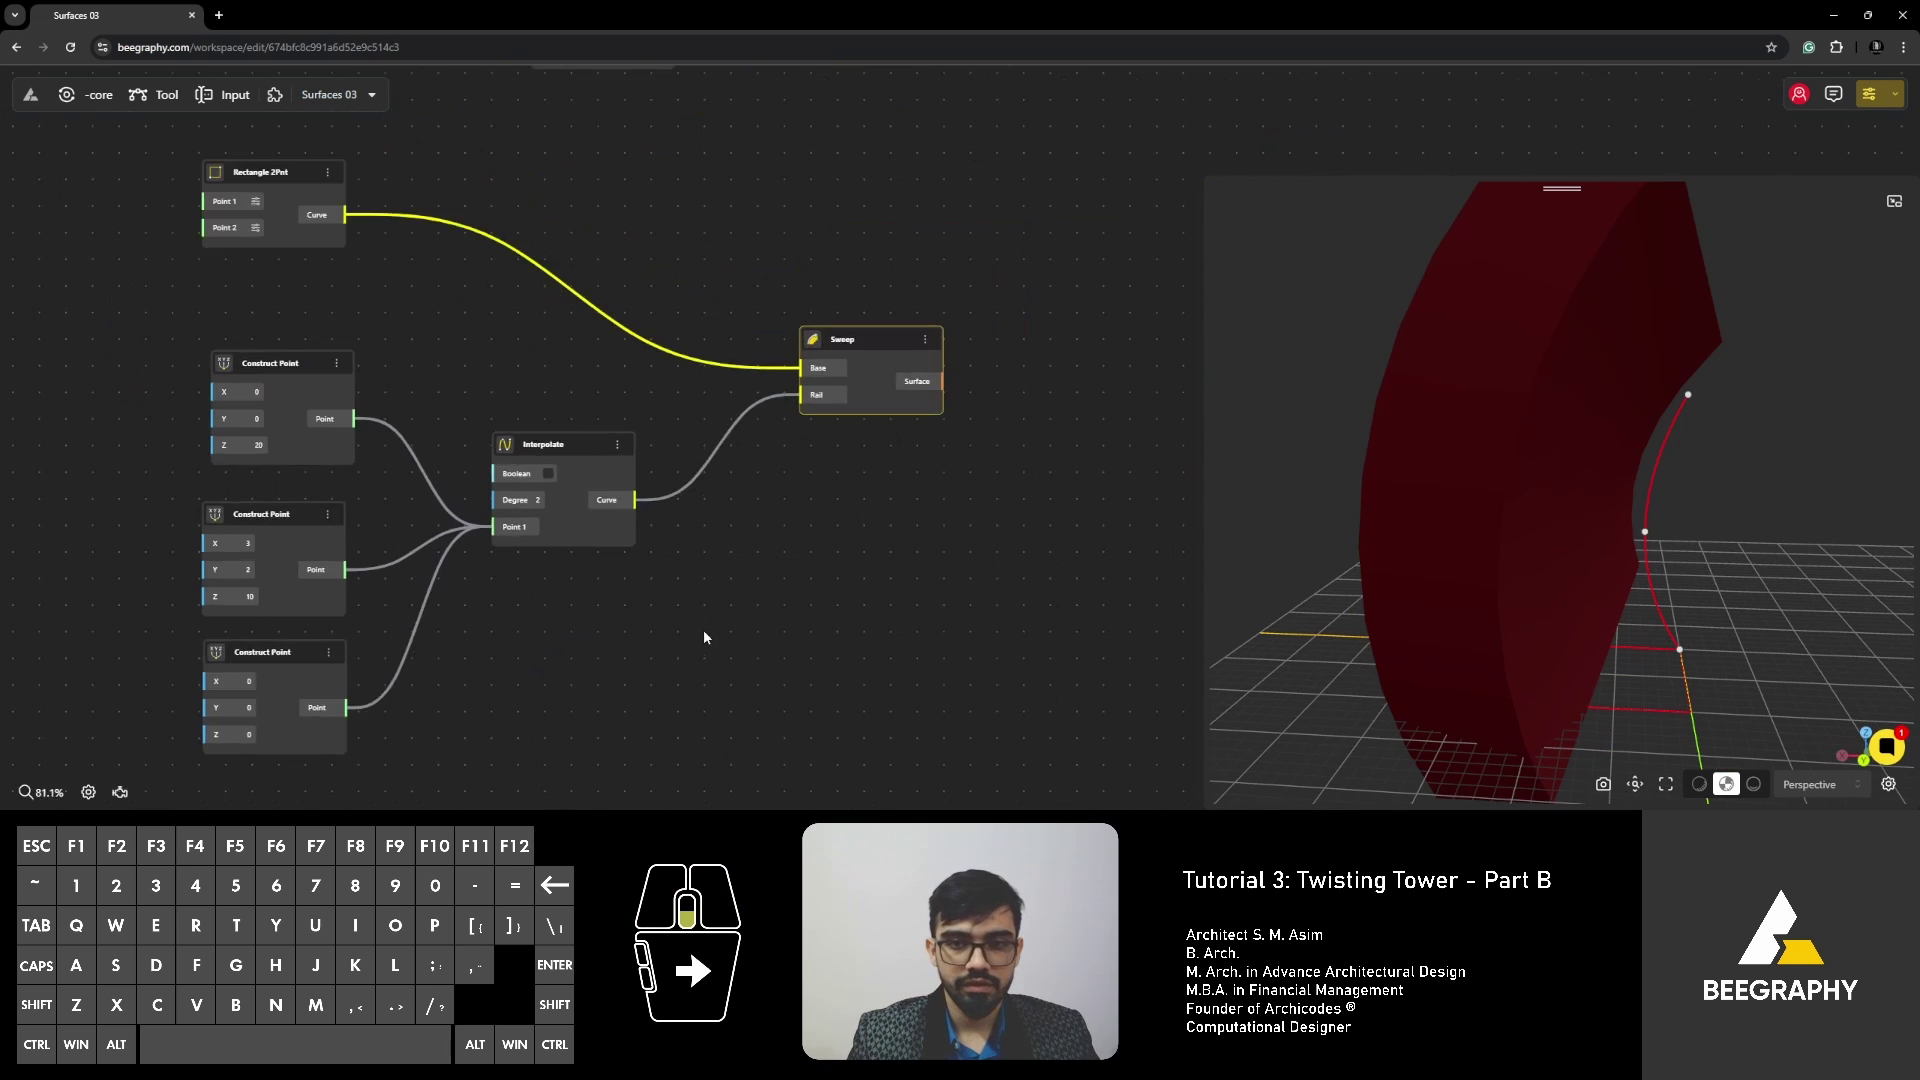
While extrusion is great for parallel surfaces, the Sweep tool excels at creating dynamic forms that follow a specific path. This makes it perfect for organic shapes, curved walls, and flowing architectural elements.
Defining Base and Rail
Sweep requires two inputs:
- A base shape, such as a circle or rectangle.
- A rail, which defines the path the base shape will follow.
Interpolation for Curve Creation
To create a rail, you can use interpolation to generate smooth curves between points. For instance, connect three points to form a flowing path, which serves as the rail for the sweep operation.
Real-world Example: Creating Dynamic Shapes
Imagine designing a spiraling staircase or a curved canopy. By sweeping a rectangle or circular base along a custom rail, you can achieve these dynamic forms effortlessly.
Loft: Constructing Surfaces Between Multiple Curves
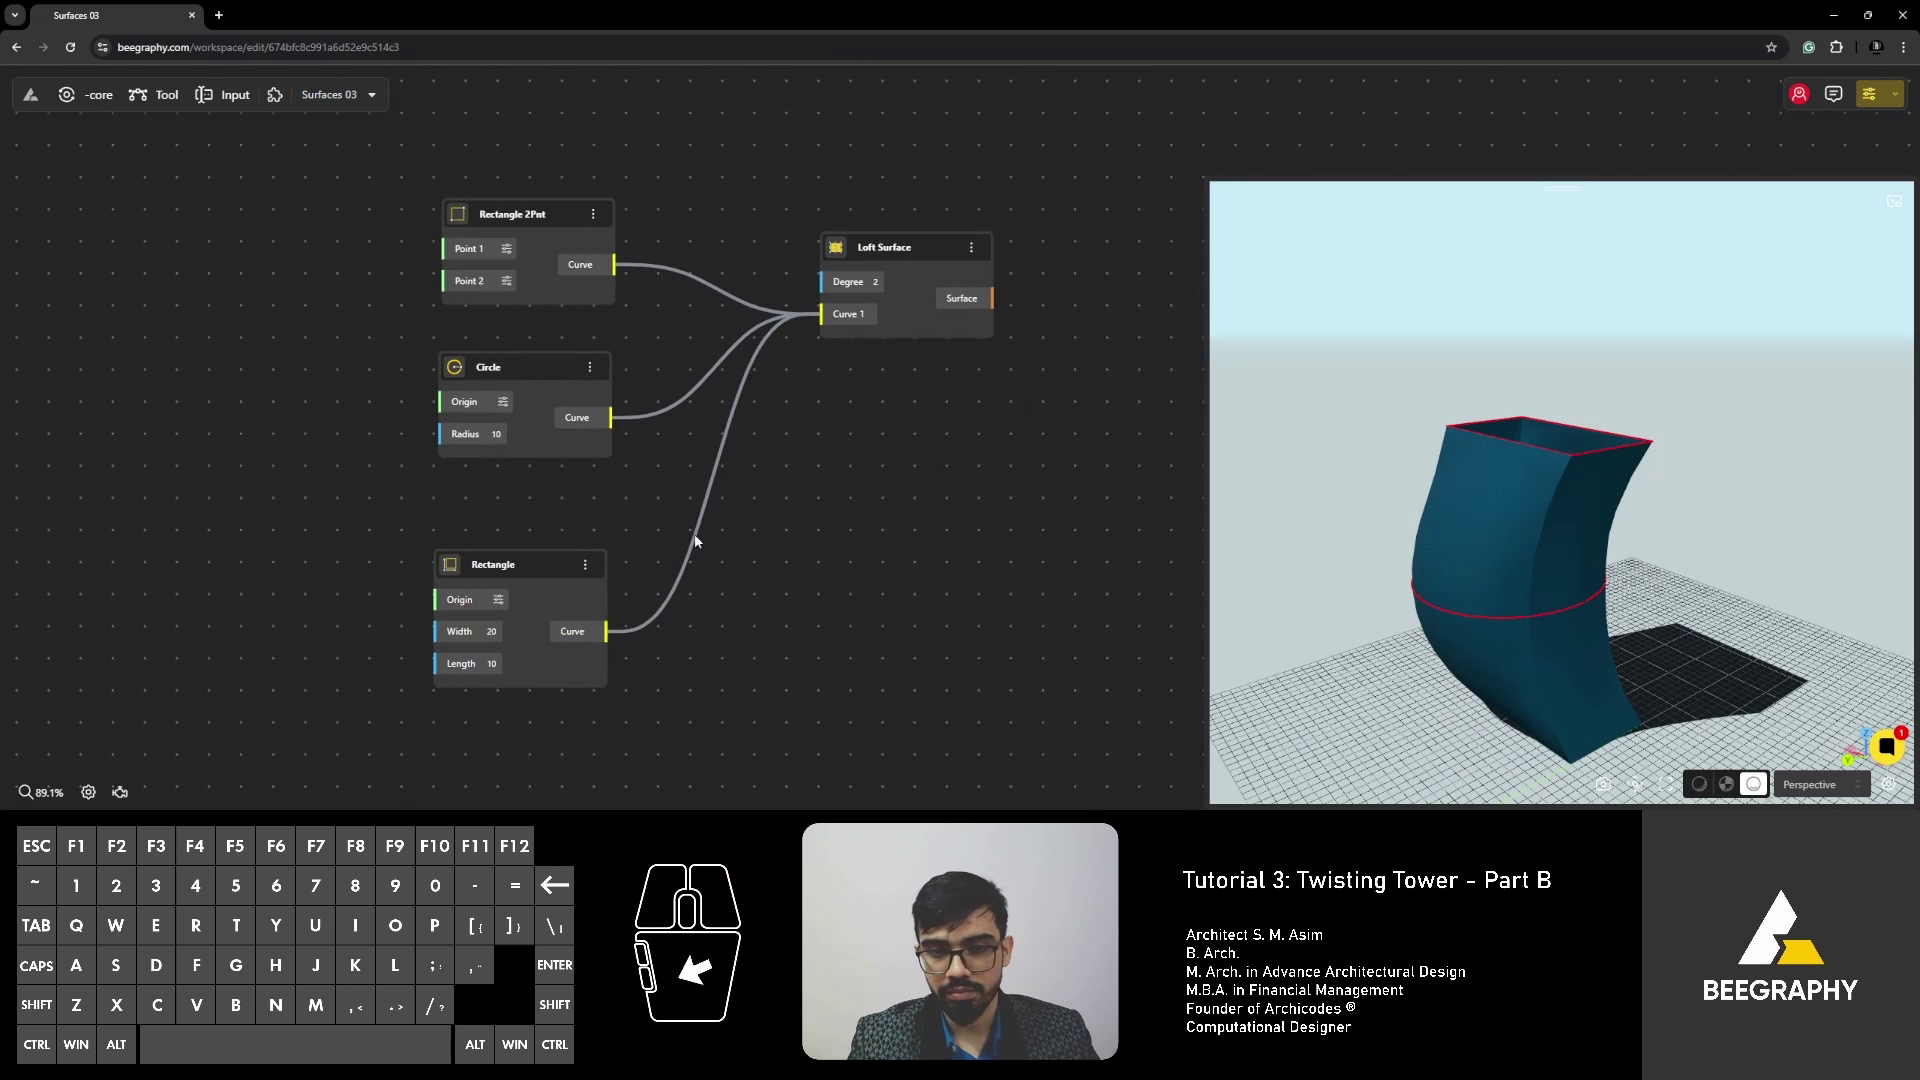
Lofting is a powerful technique for creating smooth transitions between shapes. Unlike extrusion or sweep, which rely on a single curve, lofting uses multiple curves to define the final surface.
Creating Multiple Curves: Rectangles and Circles
To begin, create two or more curves, such as a rectangle and a circle. The loft tool connects these shapes, generating a surface that blends them seamlessly.
Connecting Curves for Surface Generation
Order matters in lofting. Ensure you select curves in sequence to achieve the desired result. For example, connecting a small rectangle to a larger circle can create a funnel-like form.
Advanced Loft Techniques: Combining Shapes
Experiment with adding extra curves or altering their positions. This opens up endless possibilities for intricate forms, such as tapered surfaces, wave-like geometries, or segmented designs.
Adding Materials and Colors to Your Surfaces
A great surface deserves an equally stunning finish. BeeGraphy offers powerful material application tools to enhance the visual appeal of your designs.
Applying Materials in BeeGraphy
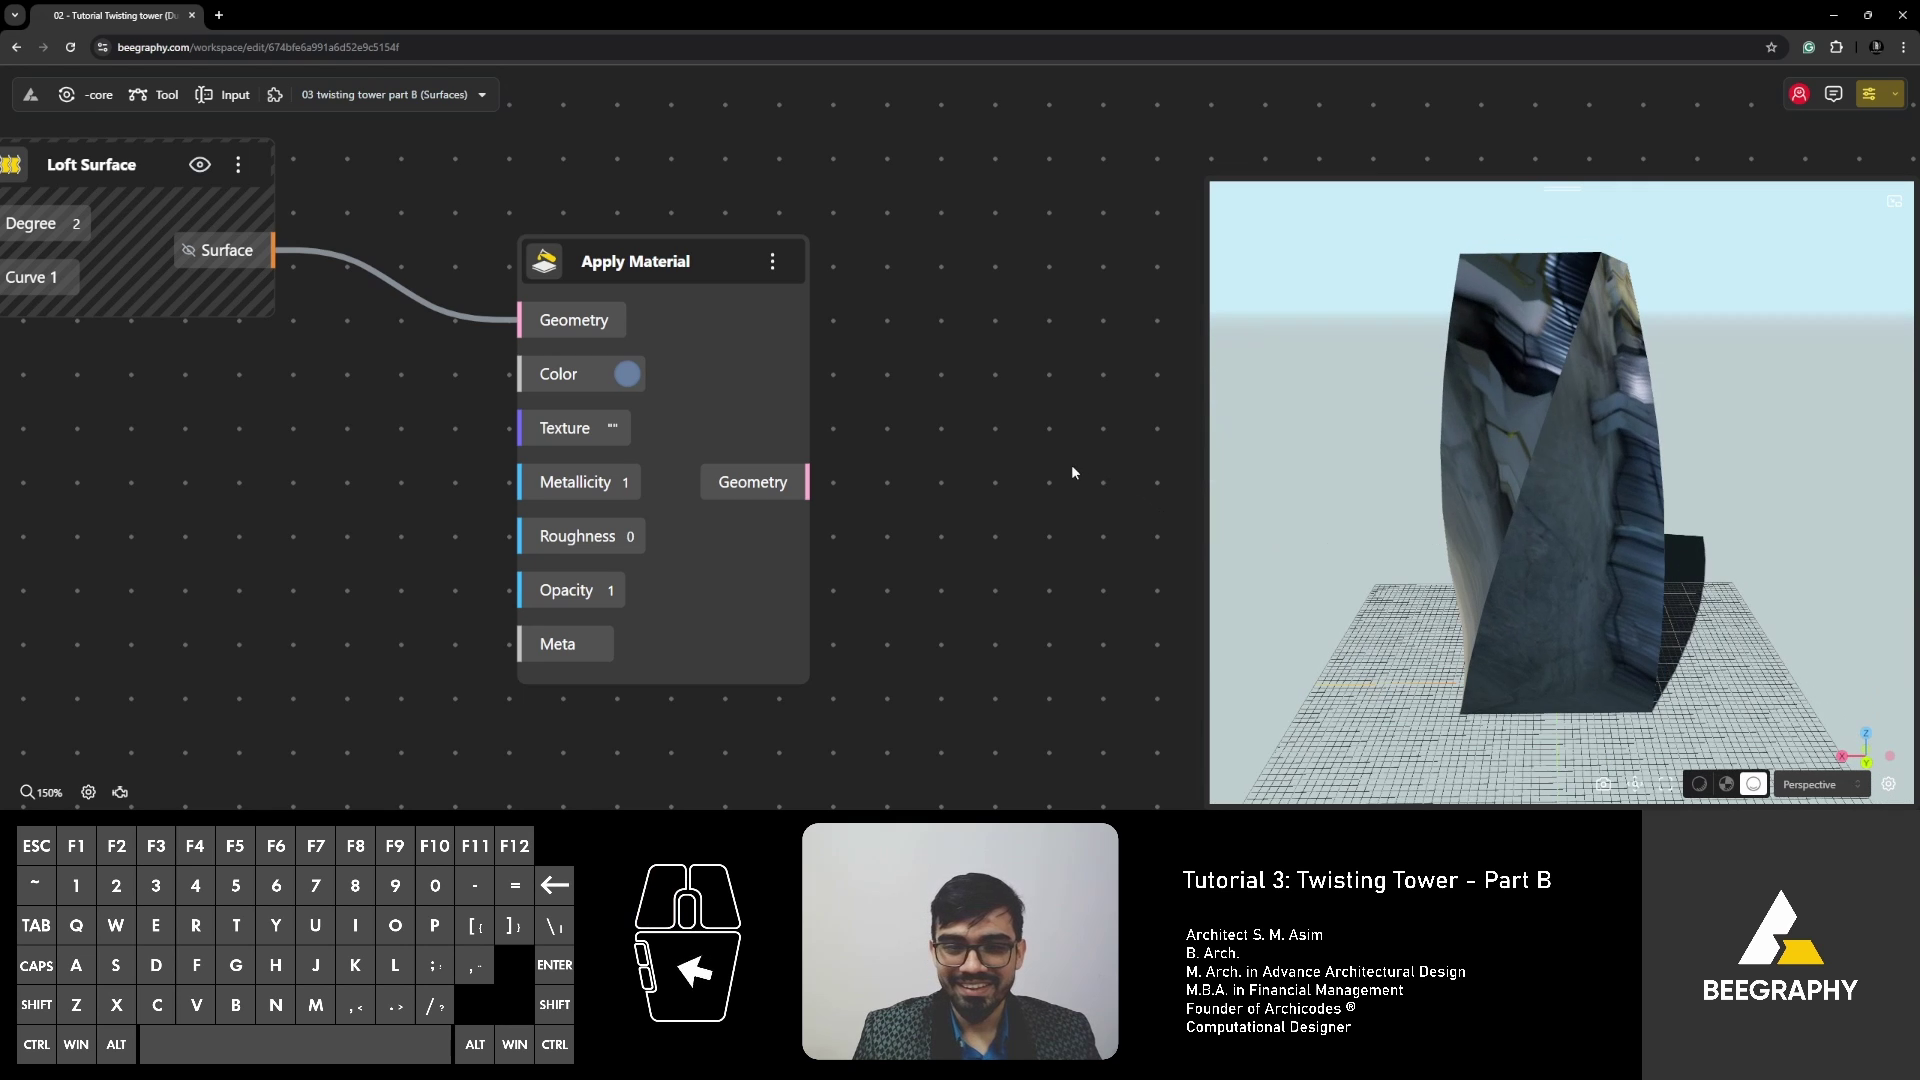
Using the “Apply Material” tool, you can assign properties like color, texture, and reflectivity to your surfaces.
Controlling Material Properties
Adjust properties such as:
- Metallicity: Controls how metallic a surface appears.
- Roughness: Determines how smooth or textured the surface is.
- Opacity: Adds transparency effects to surfaces.
Enhancing Visual Appeal
Combine material properties for dramatic effects. For instance, a high metallicity with low roughness can simulate polished metal, while varying opacity creates translucent surfaces.
Conclusion: From Simple to Complex Surfaces in BeeGraphy
Surface creation is both an art and a science. By mastering BeeGraphy’s tools—Loft, Extrude, and Sweep—you’ll unlock new dimensions of creativity and functionality in your designs.
Key Takeaways
- Loft: Ideal for blending multiple curves into a unified surface.
- Extrude: Perfect for adding depth and volume to simple shapes.
- Sweep: Best for creating flowing, dynamic forms.
Expanding Your Skills
Take your skills to the next level by exploring BeeGraphy’s advanced features, such as attractor points, parametric equations, or dynamic facades.
Next Steps
Practice these techniques by integrating them into real-world projects. The more you experiment, the more you’ll discover the potential of parametric design.
Transform Your Creative Vision with BeeGraphy
BeeGraphy is the ultimate collaborative platform for parametric design. Its cloud-based tools enable real-time collaboration, seamless sharing, and effortless integration into any workflow.
Start your journey today at BeeGraphy.com and explore a world of design possibilities!


