Table of Contents
Project sheet · Prosthetics · Hand brace
A 3D printed hand brace works best when it is shaped around the hand that wears it. This one is generated from a single hand scan. One BeeGraphy graph reads the scan, finds the hand’s axis, wraps it in a flexible shell, cuts it to fit and exports an STL that is ready for TPU filament.
Want to try it first? Open the hand brace configurator and change the pattern, closure and fit settings with sliders.
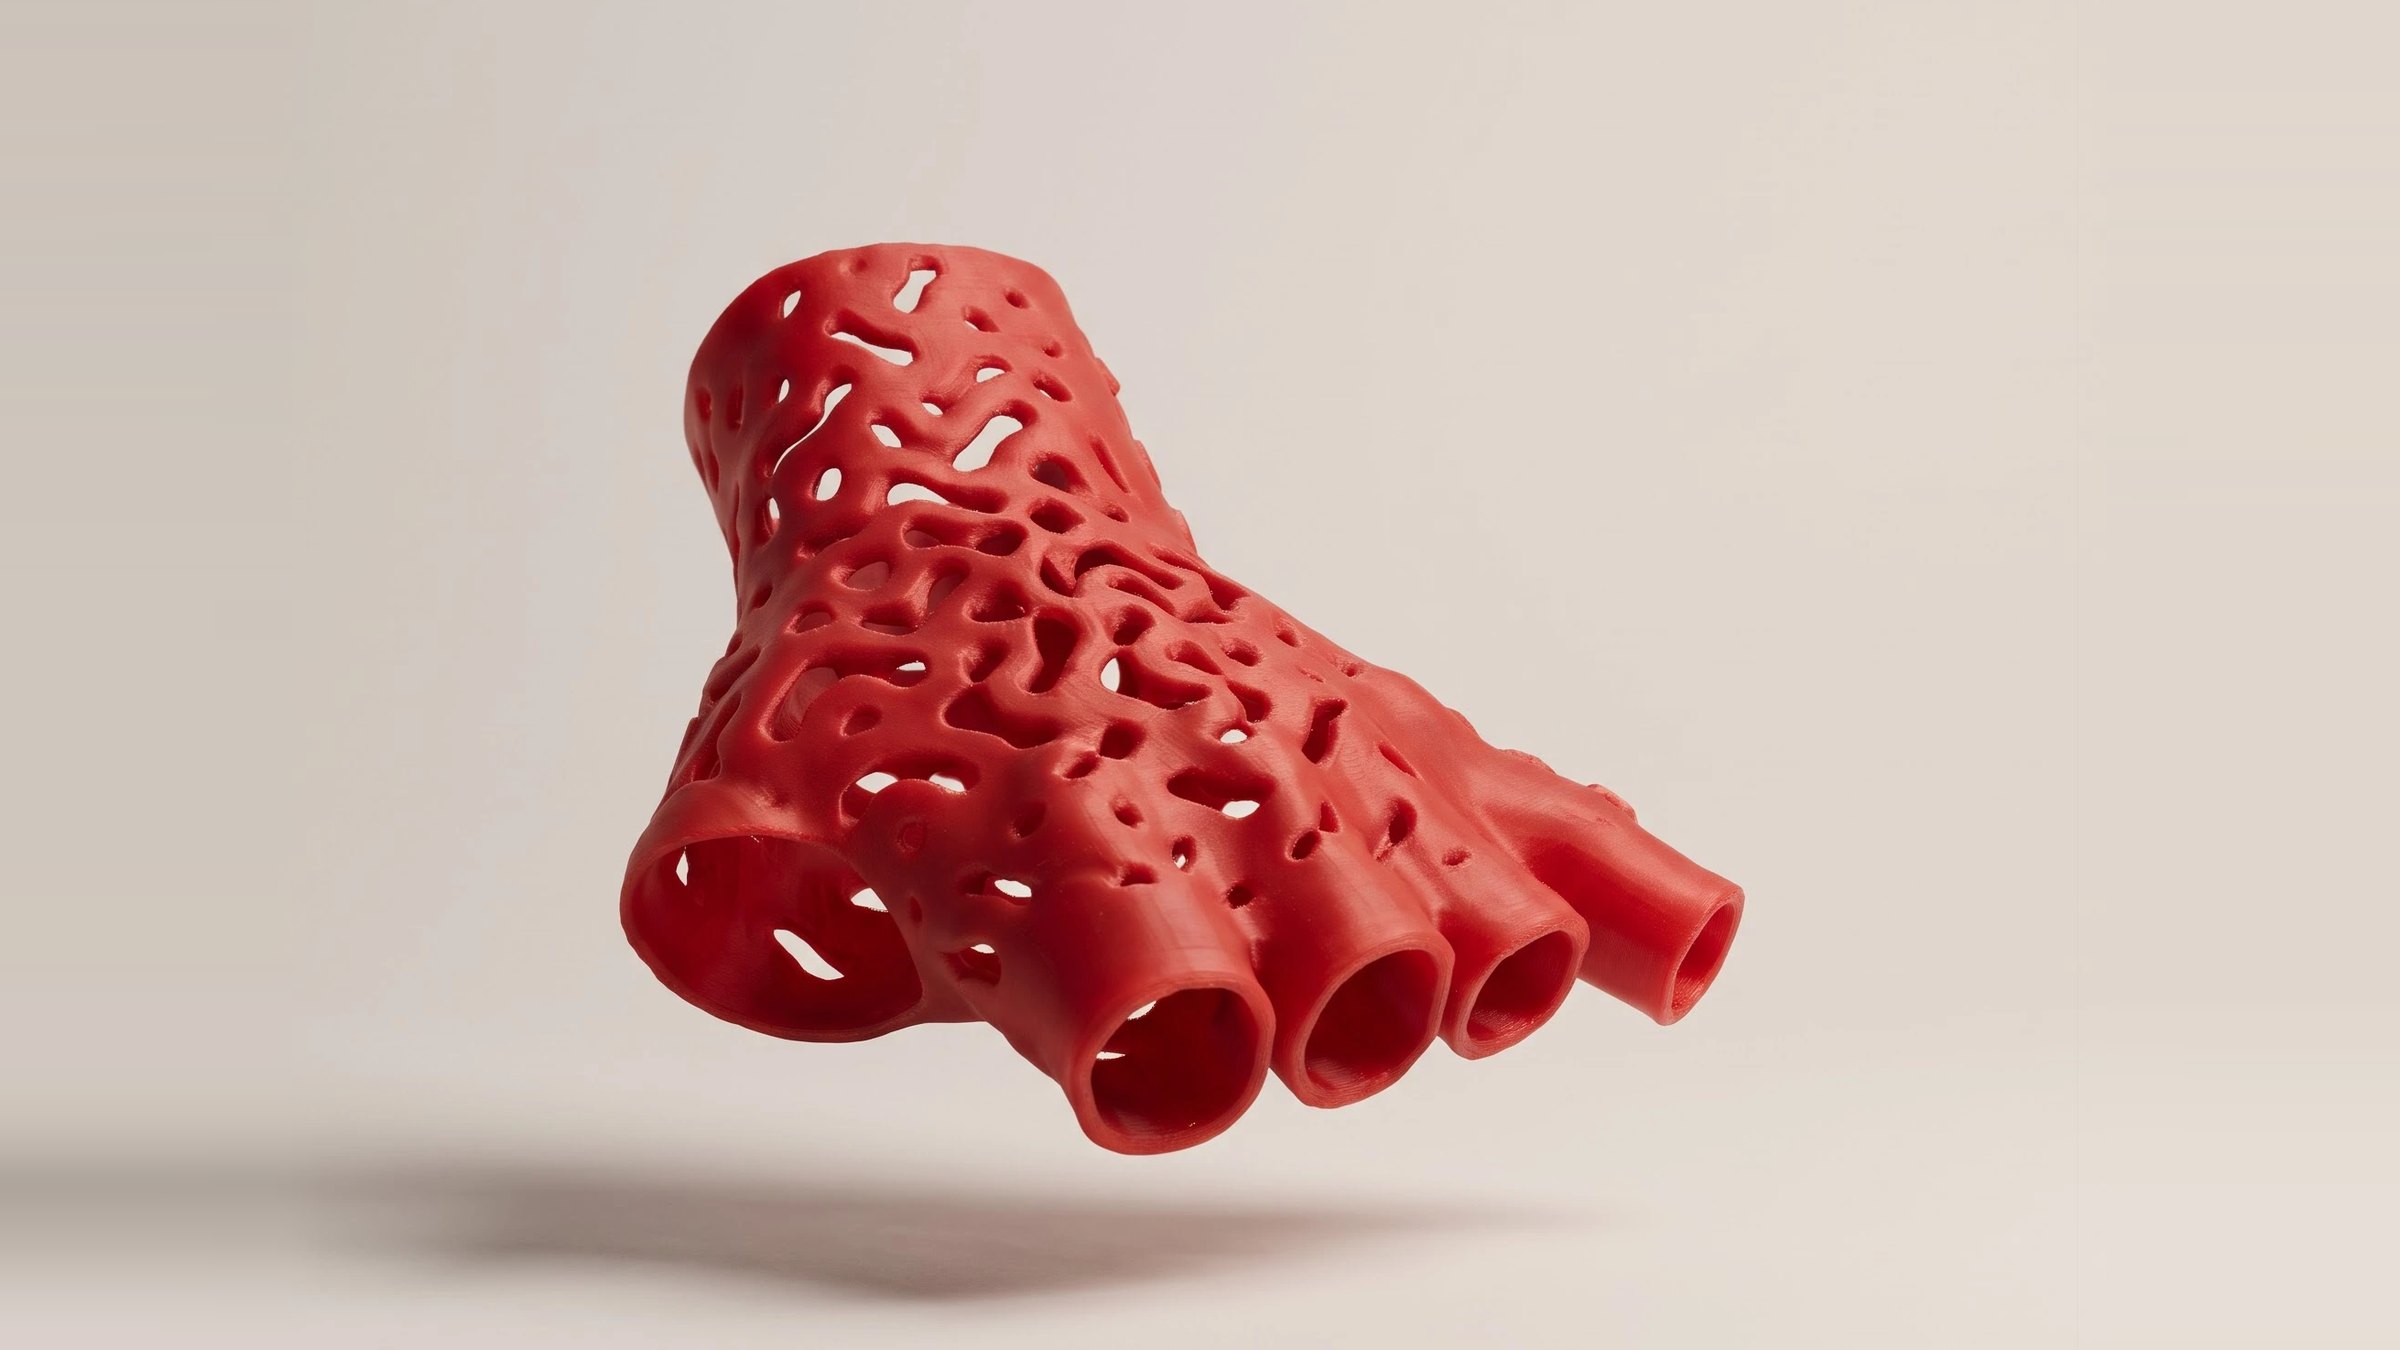
Fig. 00 · The printed brace in red TPU. Every finger sleeve, opening and edge comes from the wearer’s own scan.
| Input | 3D hand scan (mesh) |
| Output | Preview mesh and printable STL |
| Material | Flexible TPU |
| Graph | 83 nodes in 15 groups |
| Geometry engine | 3 TypeScript script nodes |
| Options | 5 patterns, 4 closures, 2 thumb styles |
How the 3D printed hand brace graph is organized
The graph splits cleanly in two. On the left, native nodes hold everything a person would want to adjust: cut positions, wall thickness, the pattern and the closure. On the right, three TypeScript nodes do the heavy geometry.
That split matters for anyone who wants to turn a 3D printed hand brace into a product. Every control stays a native slider or dropdown, so it can be published as a configurator input, while the code handles work that would otherwise take hundreds of native nodes.
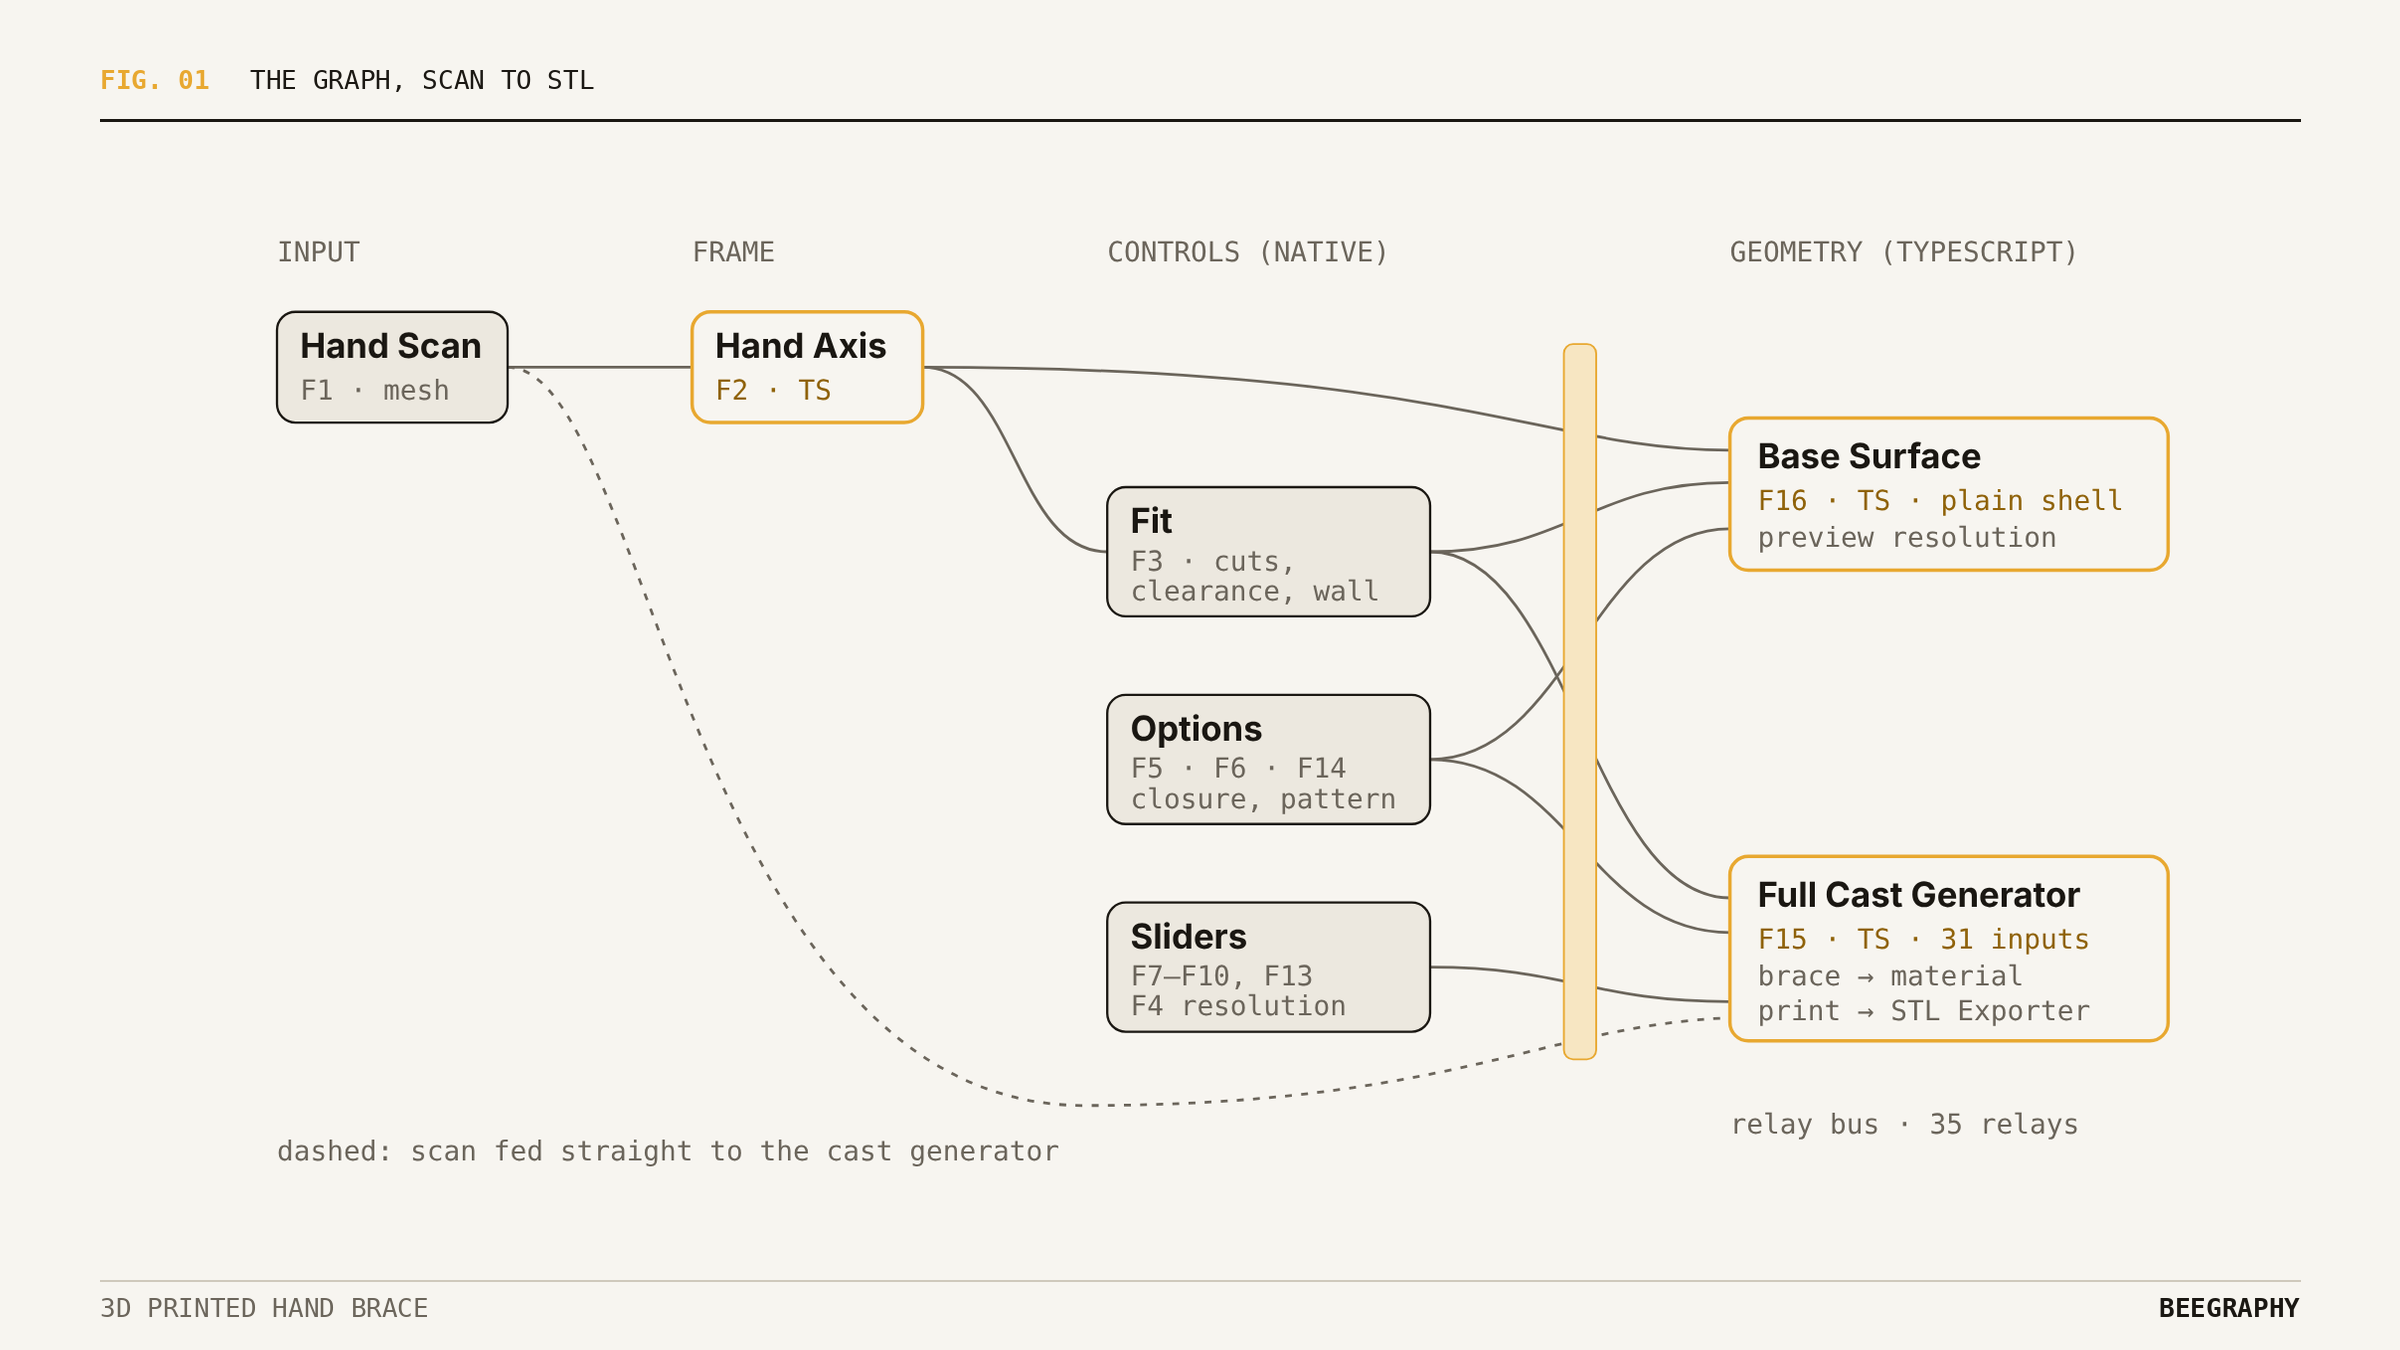
Fig. 01 · The graph in five stages. Outlined in amber: the TypeScript nodes. A column of relay nodes carries shared values across to the Base Surface node, so the wiring stays readable.
01 · Scan and axis: finding the hand inside the mesh
The scan arrives as a plain mesh and is scaled to millimeters. The first script reads its vertices and triangles, then runs a principal component analysis to find the hand’s long axis.
The rounder end of the mesh is the forearm, so the axis starts there and points toward the fingers. Every later step measures from this origin and direction. A new scan in a different pose fits the same way, with no manual alignment.
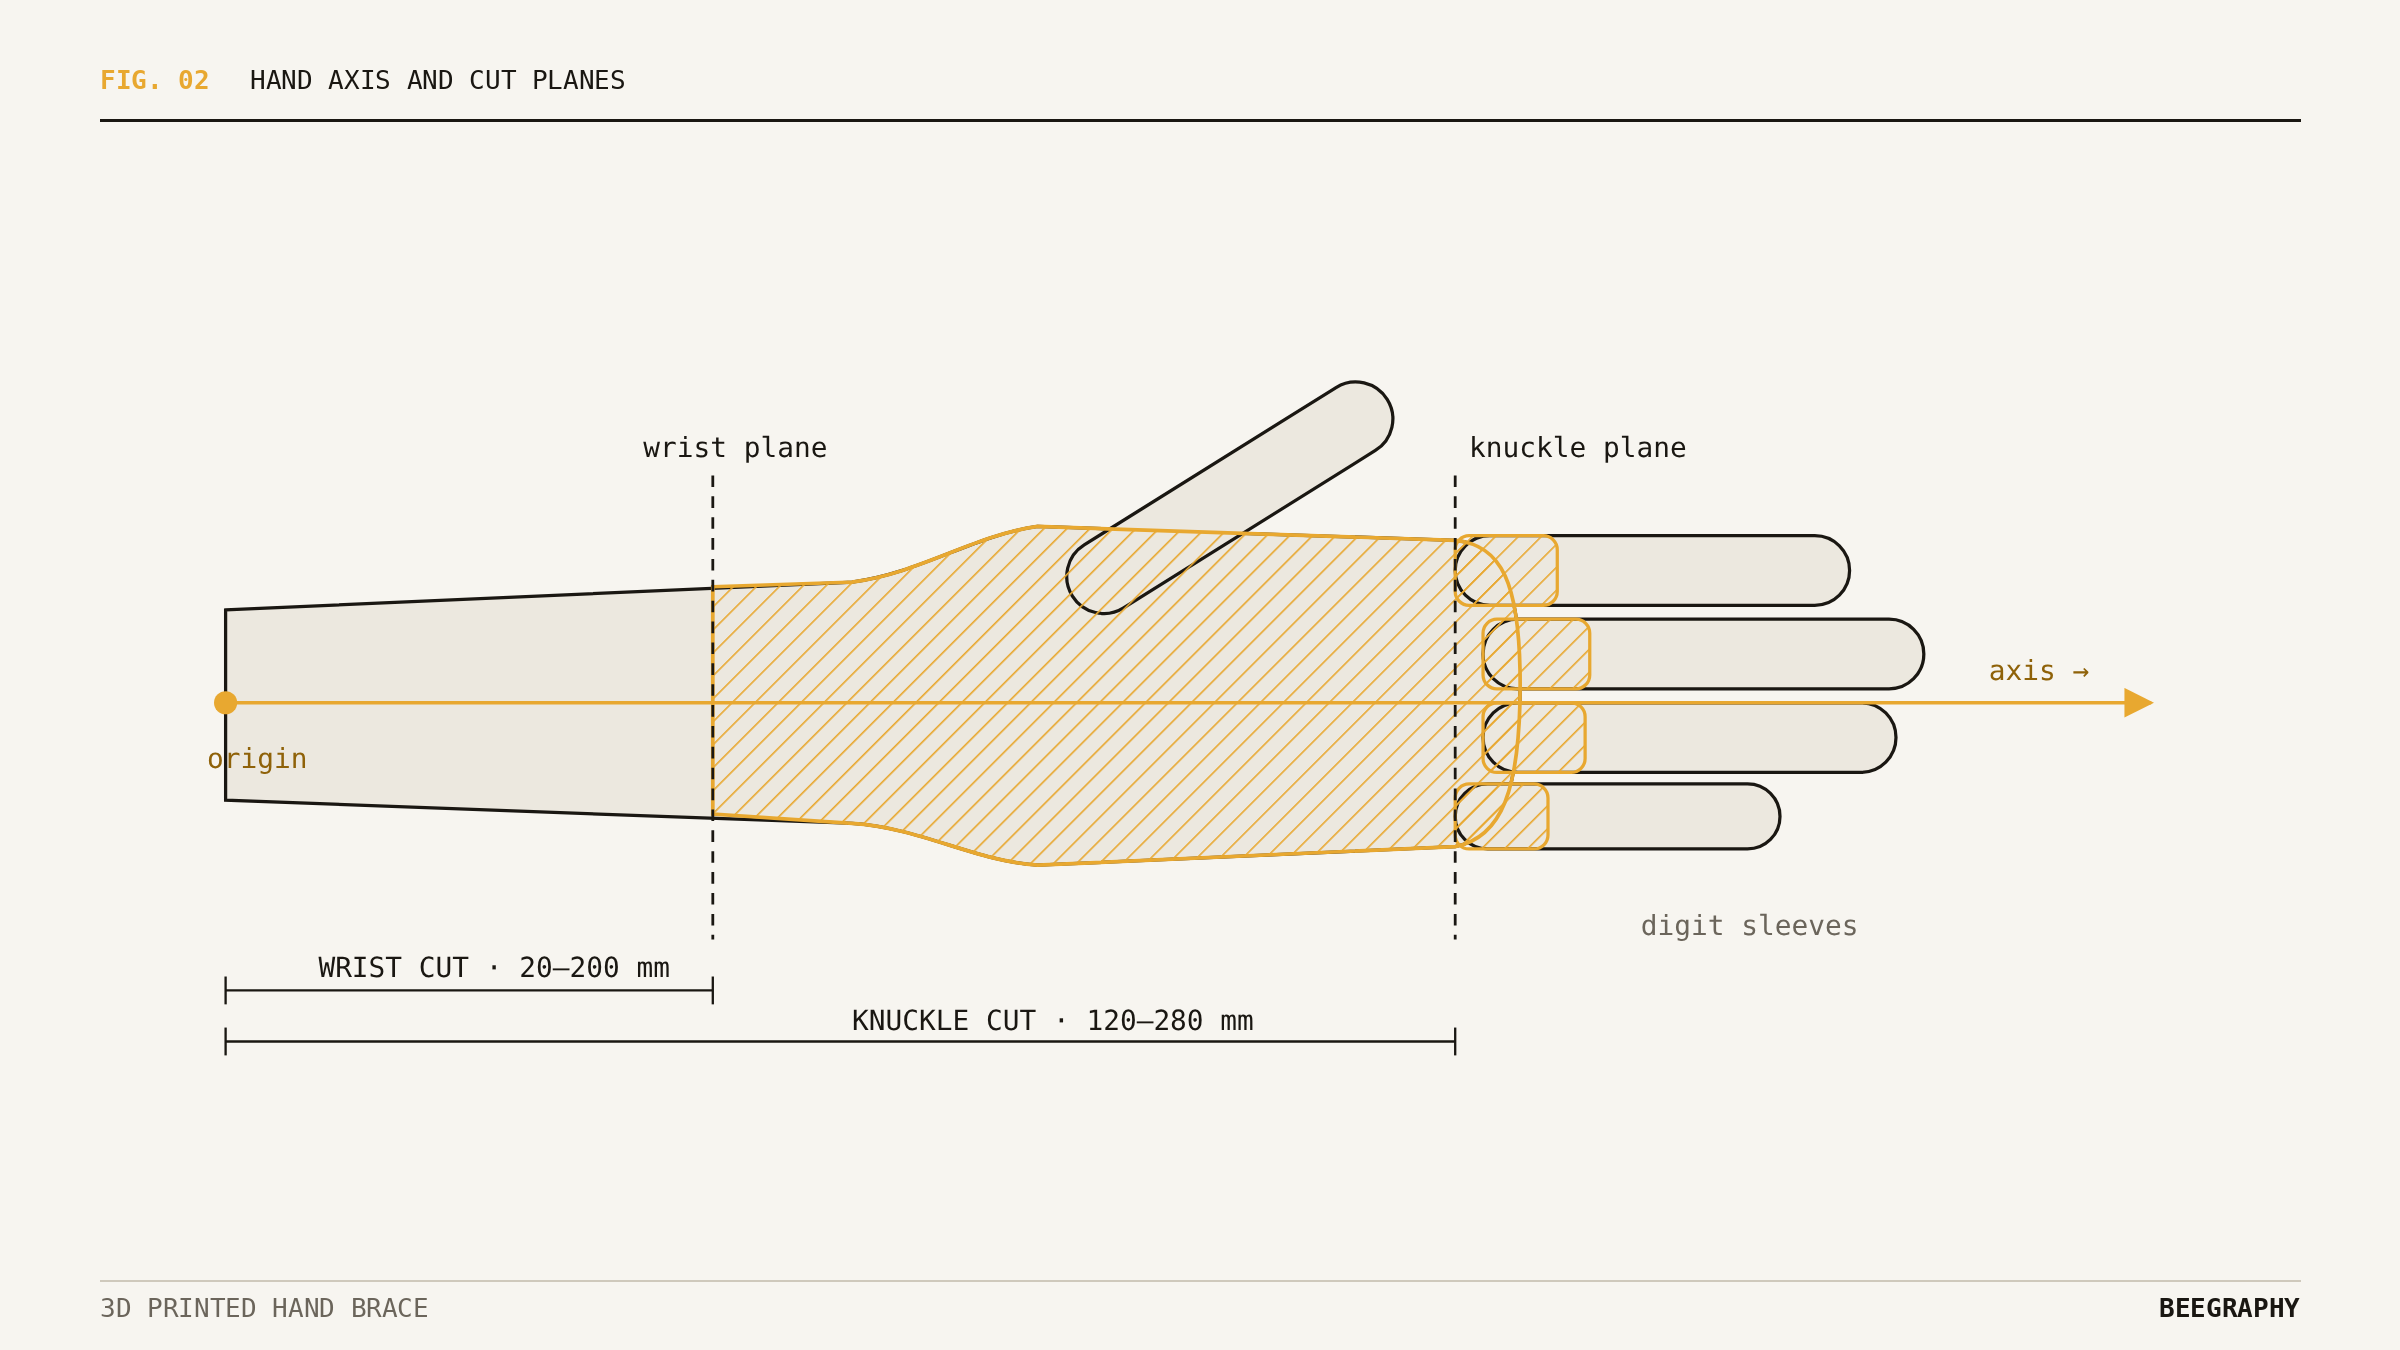
Fig. 02 · Plan, palm down. The two cut planes are points moved along the axis by native Amplitude Vector and Move nodes, so they show in the viewer while you drag the sliders. Hatched: the zone the brace covers.
02 · Shell: a wall that follows the skin
Every 3D printed hand brace in this graph is built as a field around the scan. Everything between the clearance offset and clearance plus thickness becomes solid. Clearance (0 to 4 mm) leaves room for skin and padding. Thickness (1.5 to 5 mm) sets how stiff the TPU wall will be.
The Base Surface node draws this plain shell first, so you can judge the fit before any pattern is cut into it.
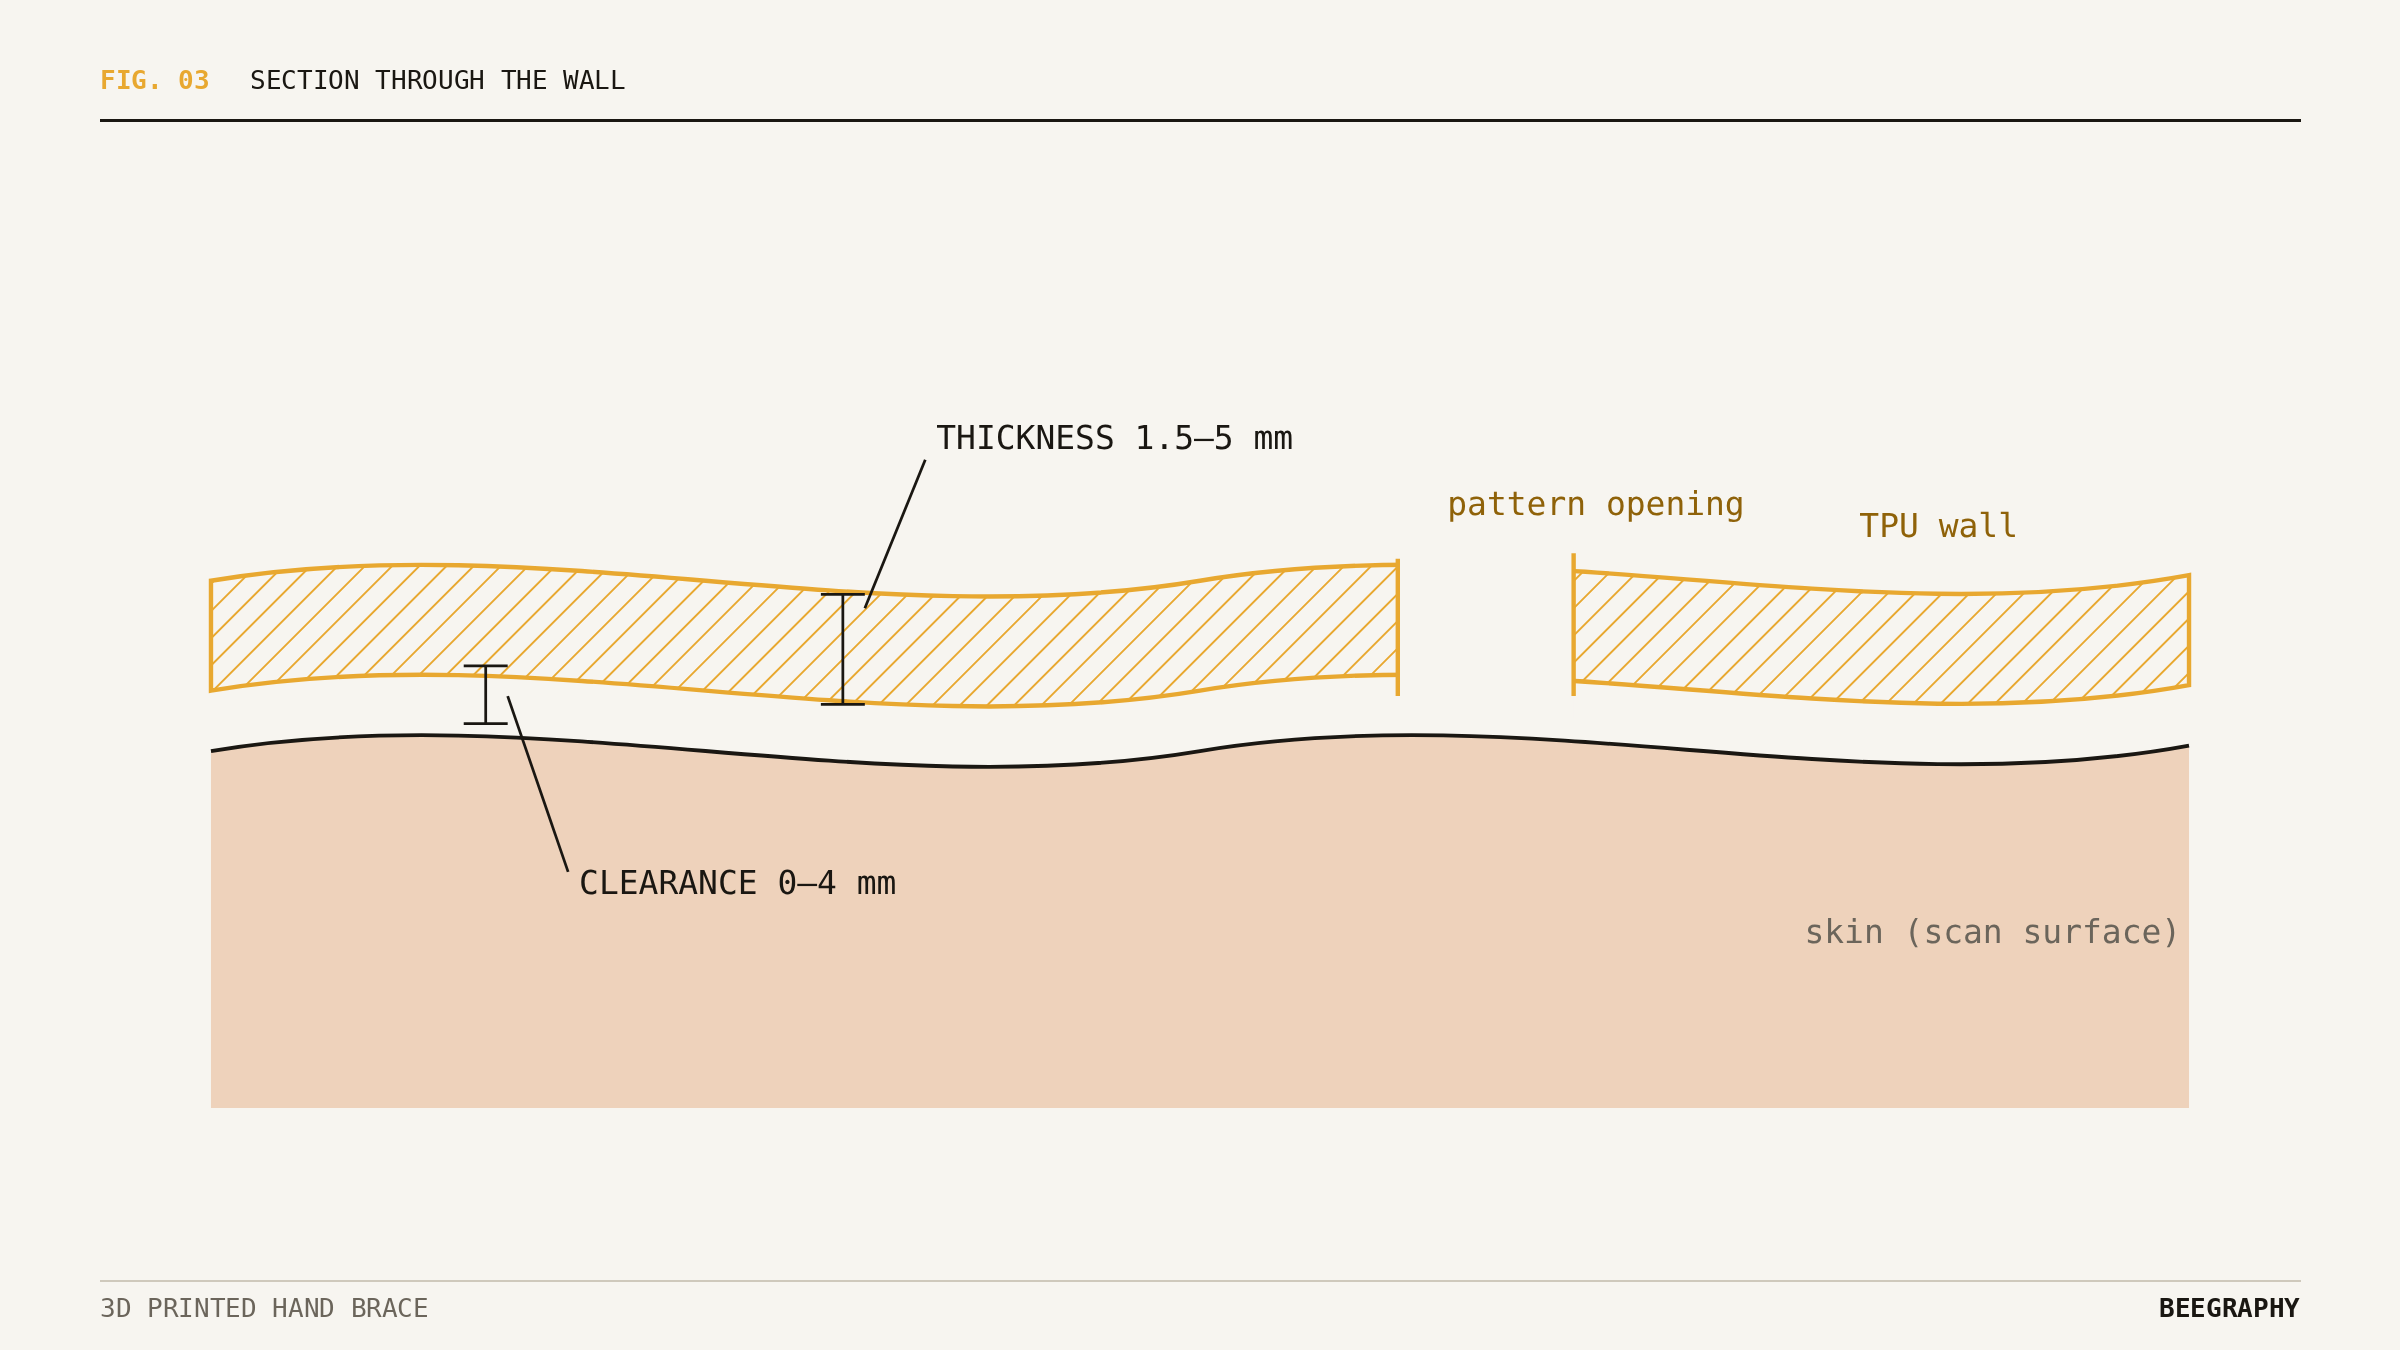
Fig. 03 · Section through the wall. Patterns cut through the full thickness; digit and wrist cuts then trim the edges.
03 · Cuts and closure: getting it on and off
Each finger and the thumb gets a clean, round cut square to its own axis. Every digit sleeve is half that digit’s measured diameter long, between 6 and 14 mm, so thin and thick fingers both get a sleeve that grips.
The 3D printed hand brace opens along the little-finger edge. The split line follows the outermost scan point at each height and is then smoothed. The thumb side stays closed and flexes as the hinge. One dropdown picks how the split closes; another picks a thumb sleeve or an open thumb.
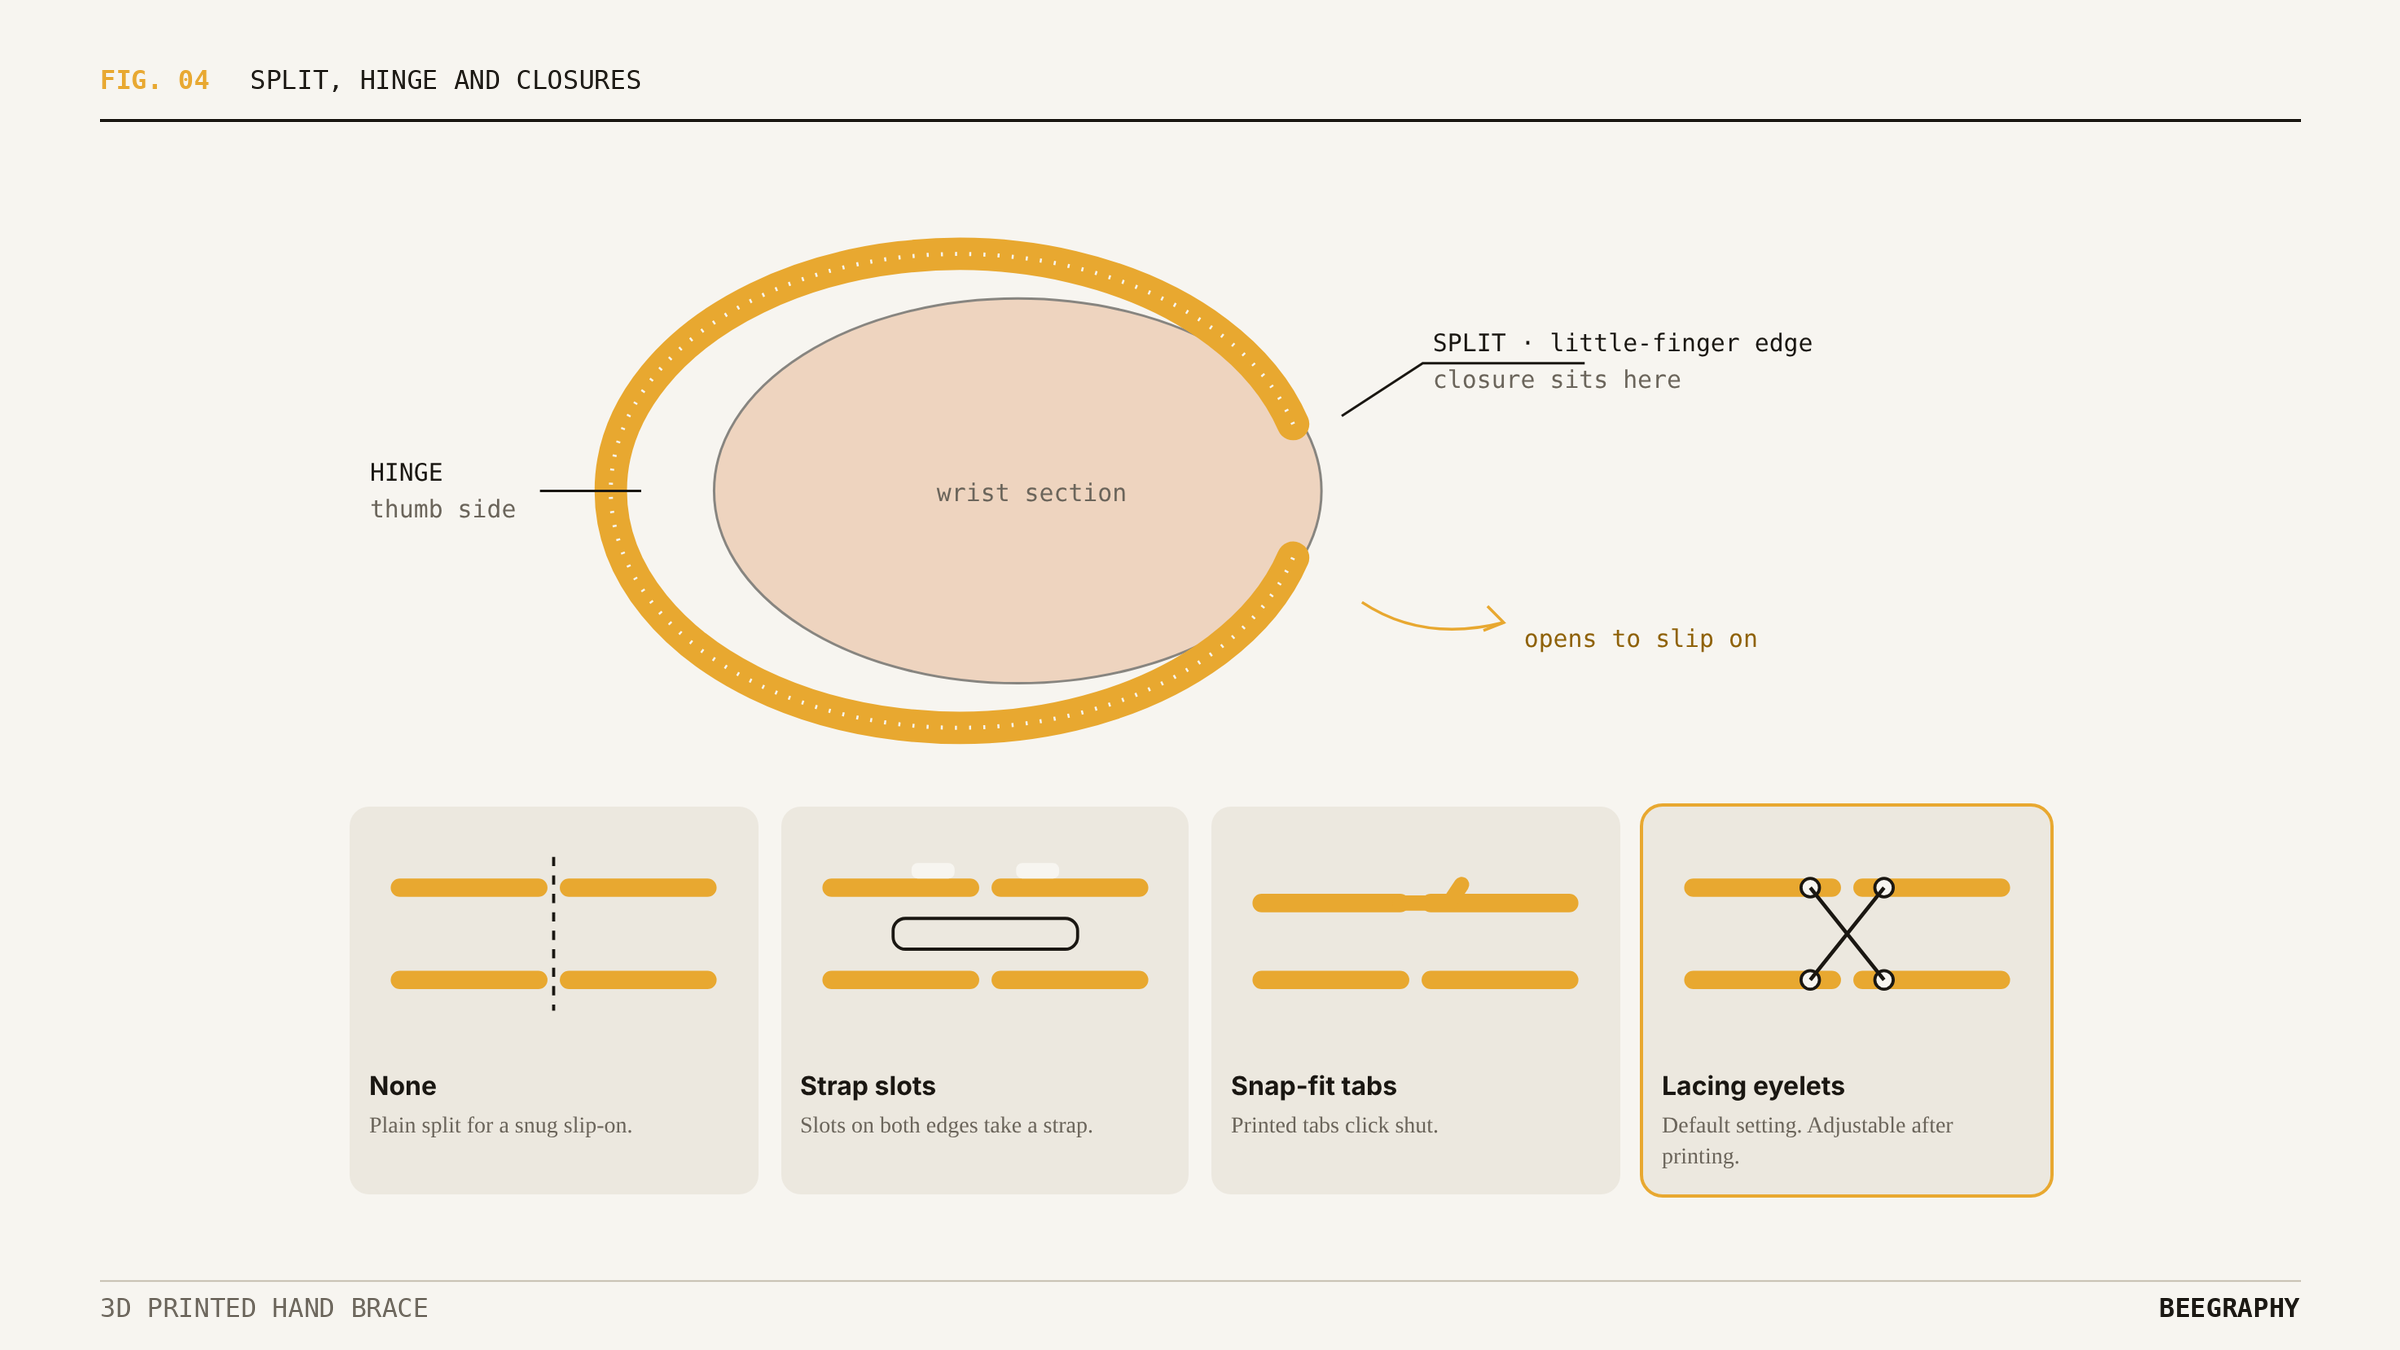
Fig. 04 · Wrist section and closure options. The wall is one piece; the gap on the little-finger side is the only opening, and the TPU on the thumb side bends to let the hand in.
04 · Pattern: five ways to open the wall
The pattern decides how the 3D printed hand brace breathes and bends. A dropdown picks one of five, and each pattern reads only its own sliders. Graded patterns also use an attractor point and a Gradient Reach slider (20 to 200 mm): cells stay small and tight near the attractor and open up further away.
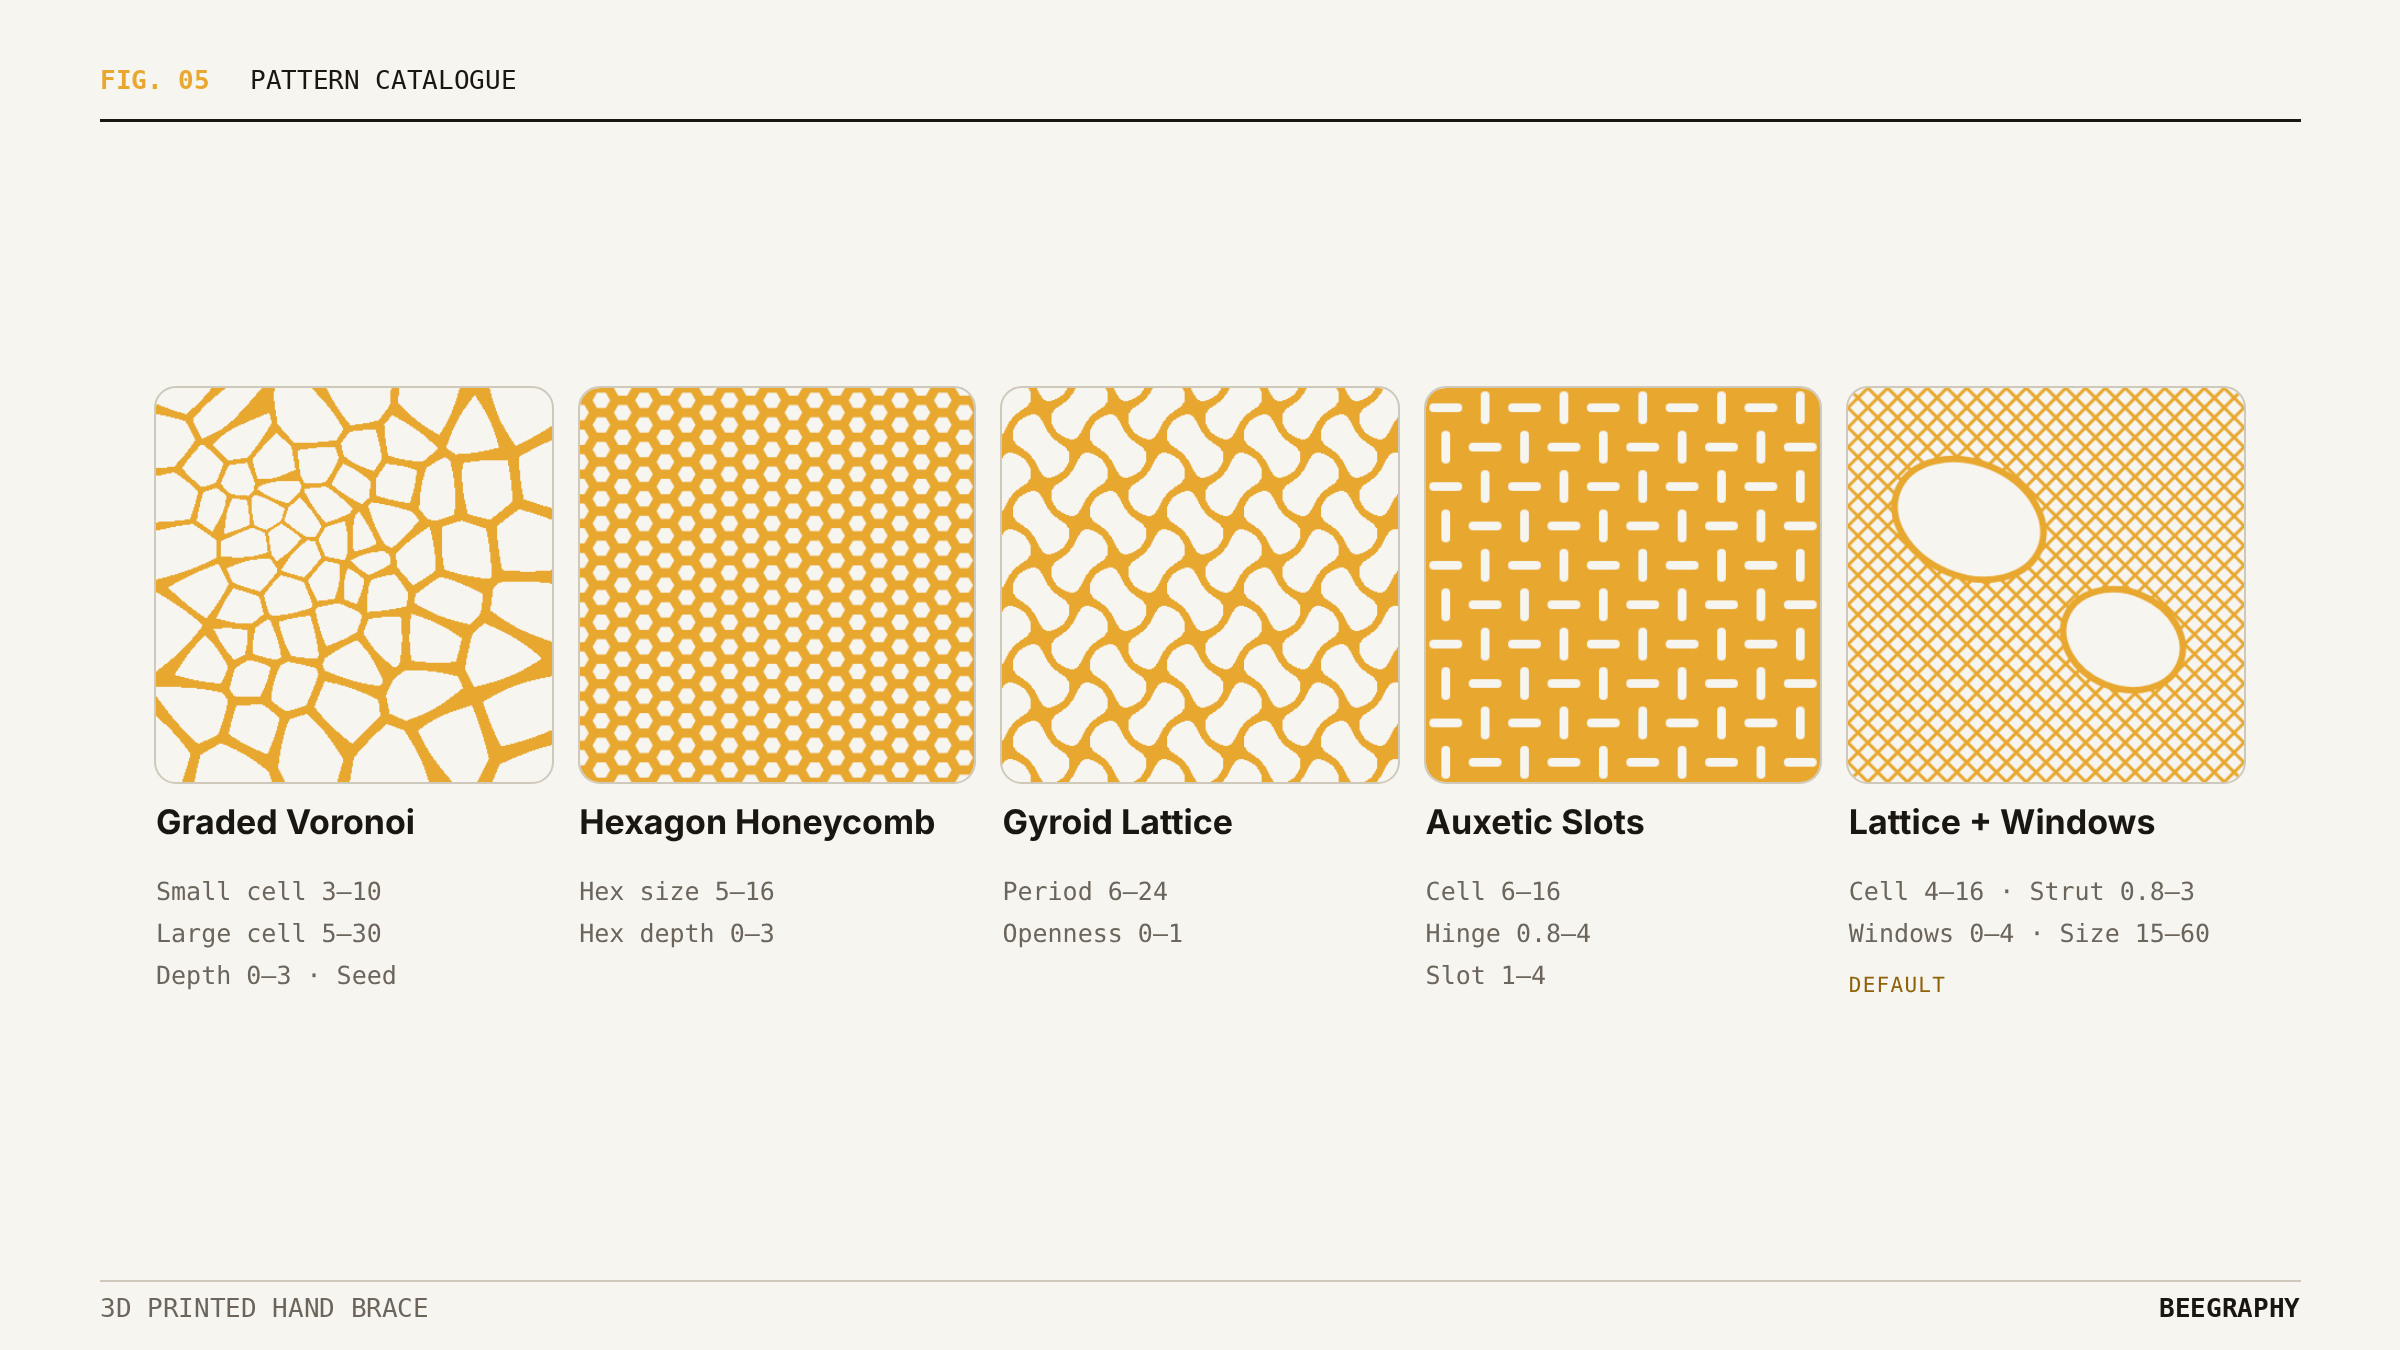
Fig. 05 · Pattern catalogue, drawn flat with slider ranges in mm. On the brace, each pattern is mapped onto the curved wall.
05 · Compute: only what changed is rebuilt
Building a full 3D printed hand brace is heavy, so the generator remembers its results per node. Moving a slider for a pattern that isn’t selected, or entering a value it already has, doesn’t trigger a rebuild.
The skin field, the most expensive step, is computed once and shared by both script nodes for the same scan and fit. The preview runs on a coarse voxel grid so dragging stays responsive; the STL is rebuilt on a fine grid for a smooth print surface.
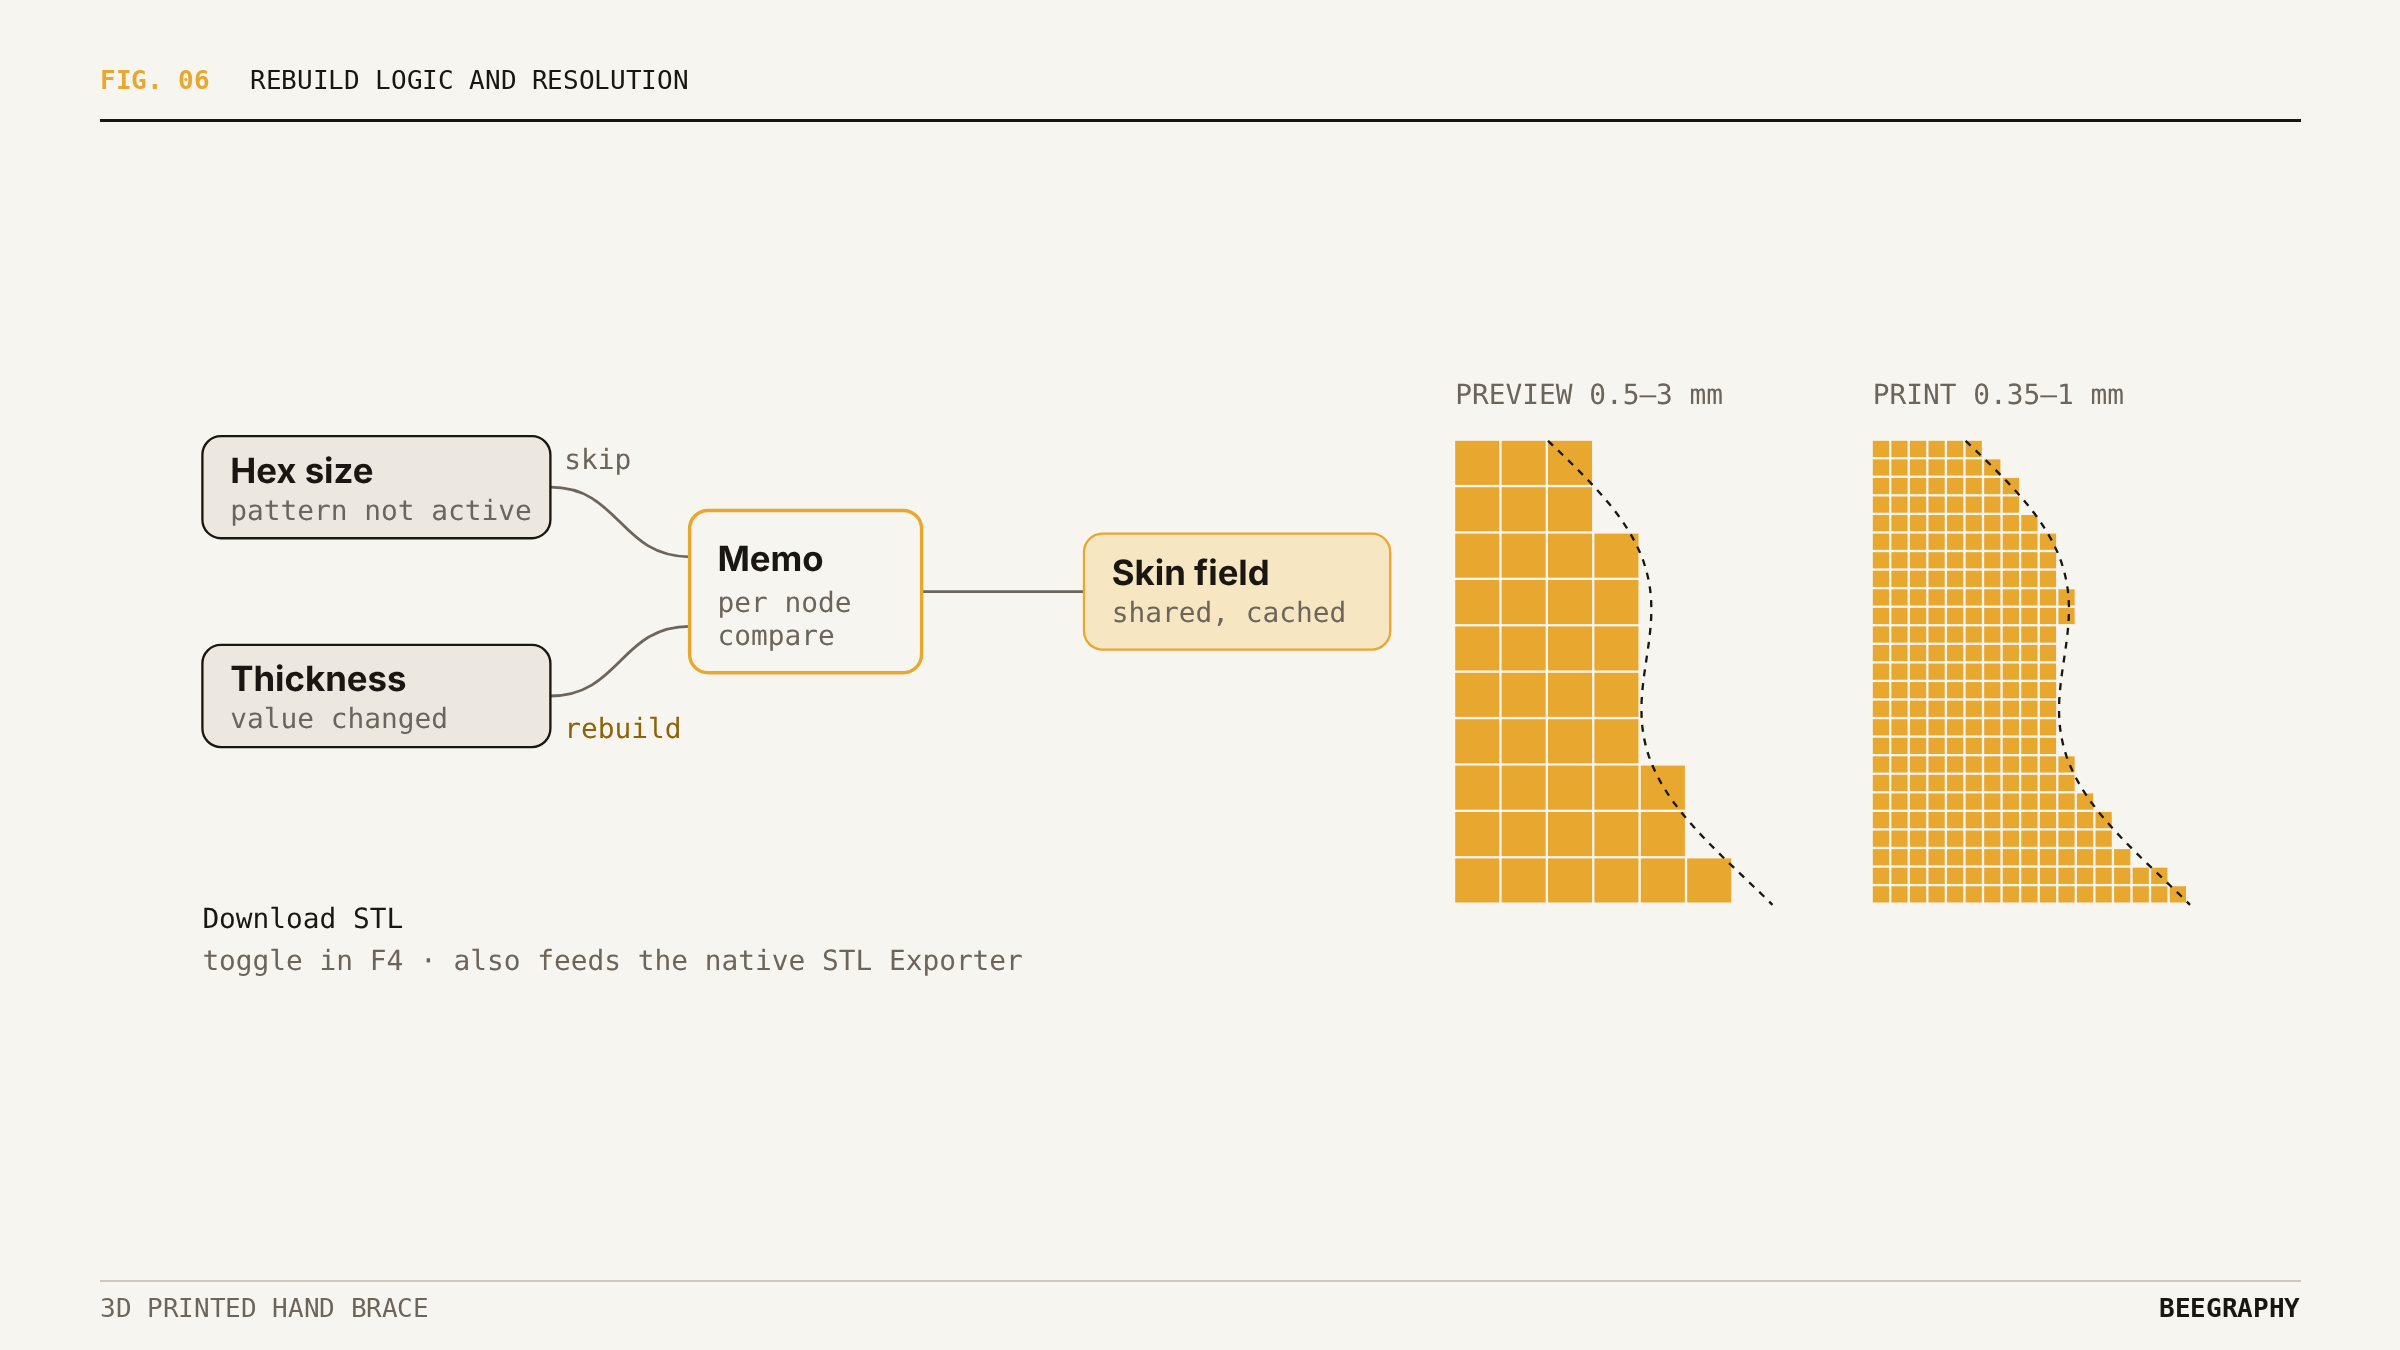
Fig. 06 · Left: how a slider change is filtered before any geometry is touched. Right: the same edge at preview and print resolution.
Printing the brace in TPU
The exported STL of the 3D printed hand brace is meant for flexible filament. Thermoplastic polyurethane (TPU) lets the thumb-side hinge bend open and spring back, and the pattern keeps the wall light and breathable. The same graph prints just as well in clear filament, where the openings read against the skin.
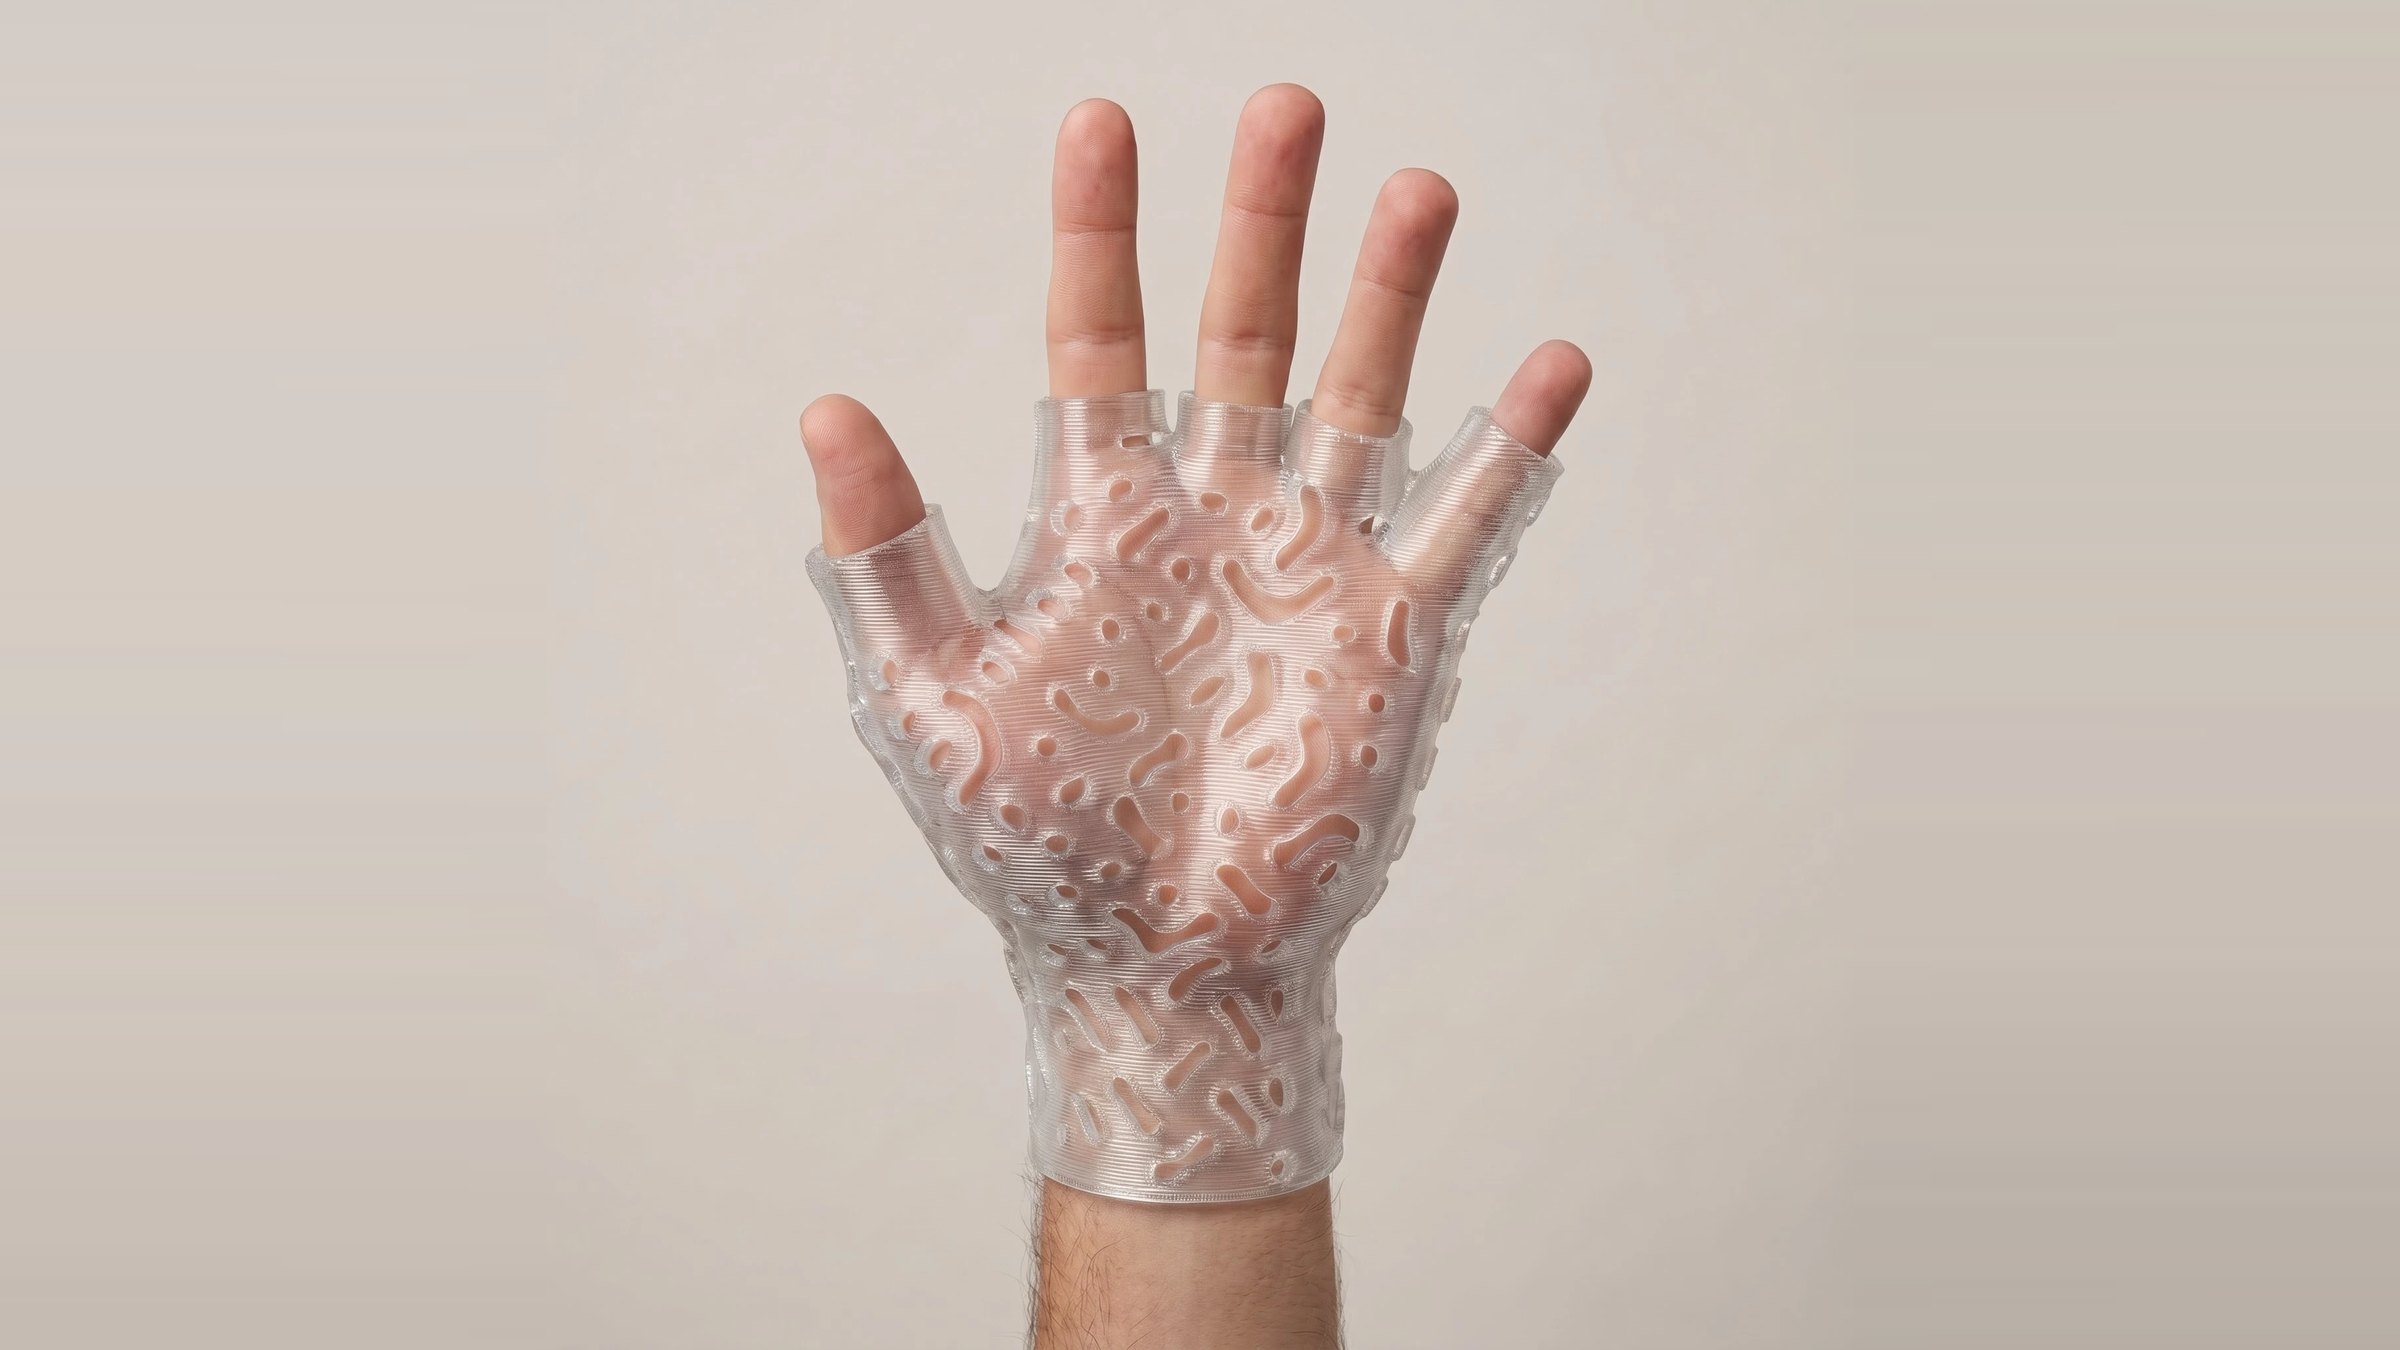
Fig. 07 · The same design printed in clear TPU and worn. The sleeves stop short of each fingertip, so the hand keeps its grip.
Scan in, STL out
- Scan: load a hand mesh and scale it to millimeters.
- Axis: PCA finds the forearm-to-finger direction.
- Fit: set the wrist and knuckle cuts, clearance and wall thickness.
- Shell: offset a TPU wall from the skin and check it as a plain surface.
- Cut: add round digit sleeves, a split on the little-finger edge and a closure.
- Pattern: open the wall with one of five patterns, graded around an attractor.
- Export: rebuild on a fine voxel grid and save the STL.
Because every control in that list is a native slider or dropdown, the same graph can become a configurator: each wearer gets a 3D printed hand brace from their own scan without ever opening the node graph.
Try the 3D printed hand brace configurator
You can explore the 3D printed hand brace yourself in the BeeGraphy configurator. Pick one of the five patterns, switch the closure, and adjust the clearance and wall thickness. The brace rebuilds in your browser as you move each slider.
Open the hand brace configurator →
Frequently asked questions
What material is used for a 3D printed hand brace?
This design is made for TPU, a flexible filament. It lets the thumb-side hinge bend open and spring back, so the brace can slip on without a hard clasp.
How does a 3D printed hand brace fit one specific person?
It is generated from that person’s hand scan. The graph measures the hand’s axis, offsets the wall from the skin by the clearance you set, and sizes each finger sleeve from that finger’s own diameter.
Can I change the pattern on the brace?
Yes. There are five patterns: Graded Voronoi, Hexagon Honeycomb, Gyroid Lattice, Auxetic Slots and Lattice + Windows. Each has its own sliders, and only the selected pattern is computed.
Is a 3D printed hand brace a medical device?
This brace is a design study. A brace meant for treatment should be specified and fitted with a clinician.
More build stories from the community are on the BeeGraphy blog.