Table of Contents
Welcome to the October update! This month, we’re thrilled to bring you a host of new features and enhancements designed to streamline your workflow and enhance your experience. Whether you’re working with complex geometries, fine-tuning your node-based projects, or simply need more control over your editing processes, this release has something for you. Let’s dive into the highlights!
1. Plugin Manager – A whole ecosystem
We’re excited to introduce the Plugin Manager, a comprehensive ecosystem designed to empower users to create, manage, and publish their own plugins. This system provides everything you need to extend the platform with custom features.
Key features include:
- Plugin Creation: Easily create new plugins and integrate into BeeGraphy by filling the Plugin Creation Form.
- Version Control: Seamlessly update and manage different versions of your plugin.
- Upload and Deployment: Follow a step-by-step process—Upload, Unzip, Install, Build, Grab, and Deploy—to ensure that your plugins are ready for use.
- Publishing: With a two-step publishing process (Alpha Publish, then Full Publish), you have complete control over when and how your plugins go live. You can also unpublish a plugin within 24 hours if needed.
2. Undo and Redo Functionality (CTRL+Z)
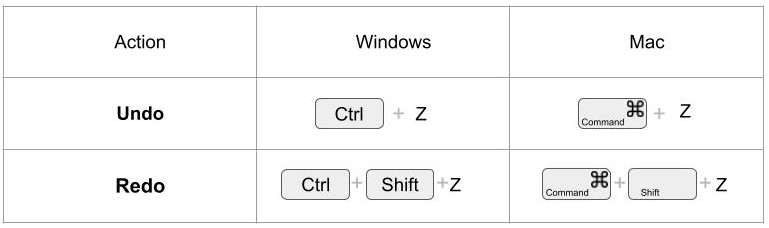
One of the most requested features is finally here! We’ve introduced the Undo and Redo functionality, allowing you to easily reverse or reinstate your actions with a simple keyboard shortcut (CTRL+Z) for Undo and (CTRL + Shift + Z) for redo. This feature is a game-changer, especially when making multiple edits, ensuring you can quickly correct mistakes or experiment with different approaches without fear of losing your progress.
3. “Contour” Node
The new “Contour” node is a powerful tool for creating contour lines or isolines on a surface or 3D geometry. These lines represent intersections with horizontal planes at equal intervals, making it easier to analyze forms and generate topographic maps. Additionally, the “Contour” node can be leveraged in 3D printing workflows to generate precise G-code. By creating slice-like contour layers, it helps define the toolpaths for additive manufacturing, ensuring accurate and efficient printing of complex geometries.
4. “Cull Curves” Node
The Cull Curves node is designed to streamline your geometry by removing duplicate or unnecessary curves. This ensures that your model remains clean and optimized, reducing complexity and preventing issues caused by redundant data. The node automates the process of identifying and deleting repeated curves, saving time and maintaining the integrity of your design.
5. “Solid/ Plane Intersection” Node
The Solid/Plane Intersection node enables precise interaction between a Solid or Brep (Boundary Representation) and a plane. This node allows you to compute the intersection lines or curves between a solid and a defined plane. It’s perfect for analyzing cross-sections or extracting data from complex geometries, making it especially valuable in CAD and 3D modeling workflows where geometric accuracy is essential.
6.”Solid/Curve Intersection” Node
The Solid/Curve Intersection node offers a powerful way to explore how curves interact with solid geometries. This node calculates the intersection points and curves where a solid and a curve meet, allowing you to design complex paths, cuts, or engravings on 3D surfaces. This is a must-have for detailed design work, especially in 3D printing, manufacturing, or architectural modeling.
7.“Plane/Plane Intersection” Node
The Plane/Plane Intersection node computes the line of intersection between two planes. This node is essential for those working with planar geometry and aligning elements in space. It simplifies tasks that involve structural or spatial alignments, such as constructing frameworks or determining intersections in architectural or engineering projects.
8. New Process for Node Copying
We’ve introduced a faster way to copy nodes in your projects. Simply hold the “Alt” key, then left-click and drag your mouse to duplicate any node. This new method allows for quicker replication of nodes, improving your workflow efficiency, especially when working on large or repetitive setups.
9. “Stream Filter” Node
We’ve added the “Stream Filter” node to our node library, expanding your options for filtering and processing data. Similar in functionality to the existing “Condition” node, the “Stream Filter” takes an array as input, providing a more flexible and powerful way to handle streams of data within your projects. This enhancement is ideal for users who need to process large datasets efficiently.
10. “Side Thickness” Node
Transform your surfaces into solids with the new “Side Thickness” node. This node receives a surface as input and outputs a solid geometry, simplifying the process of converting complex surface models into solid forms. This feature is especially useful for 3D printing, simulations, and any scenario where solid geometry is required.
11.”Smaller Than” Node
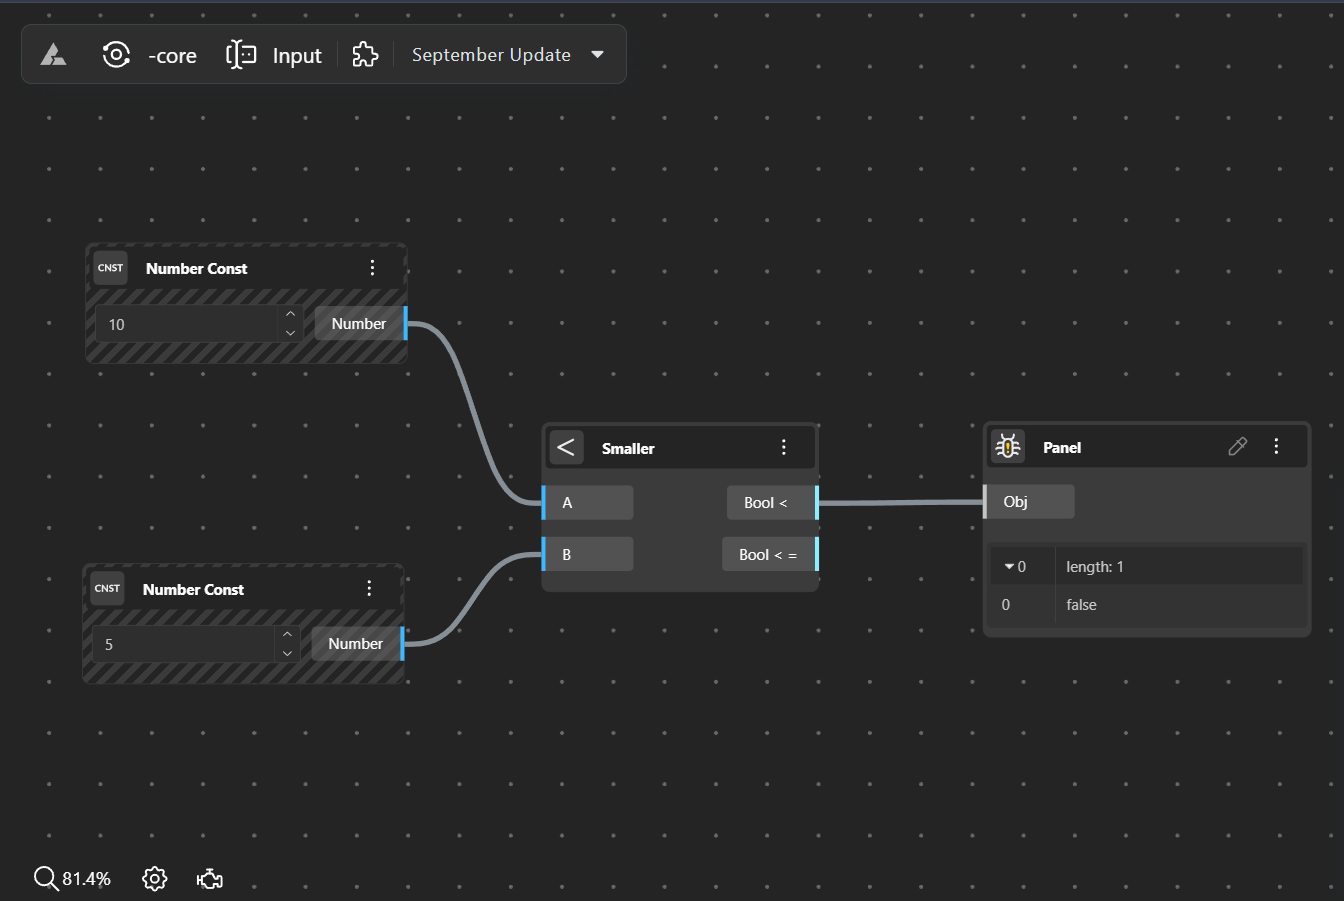
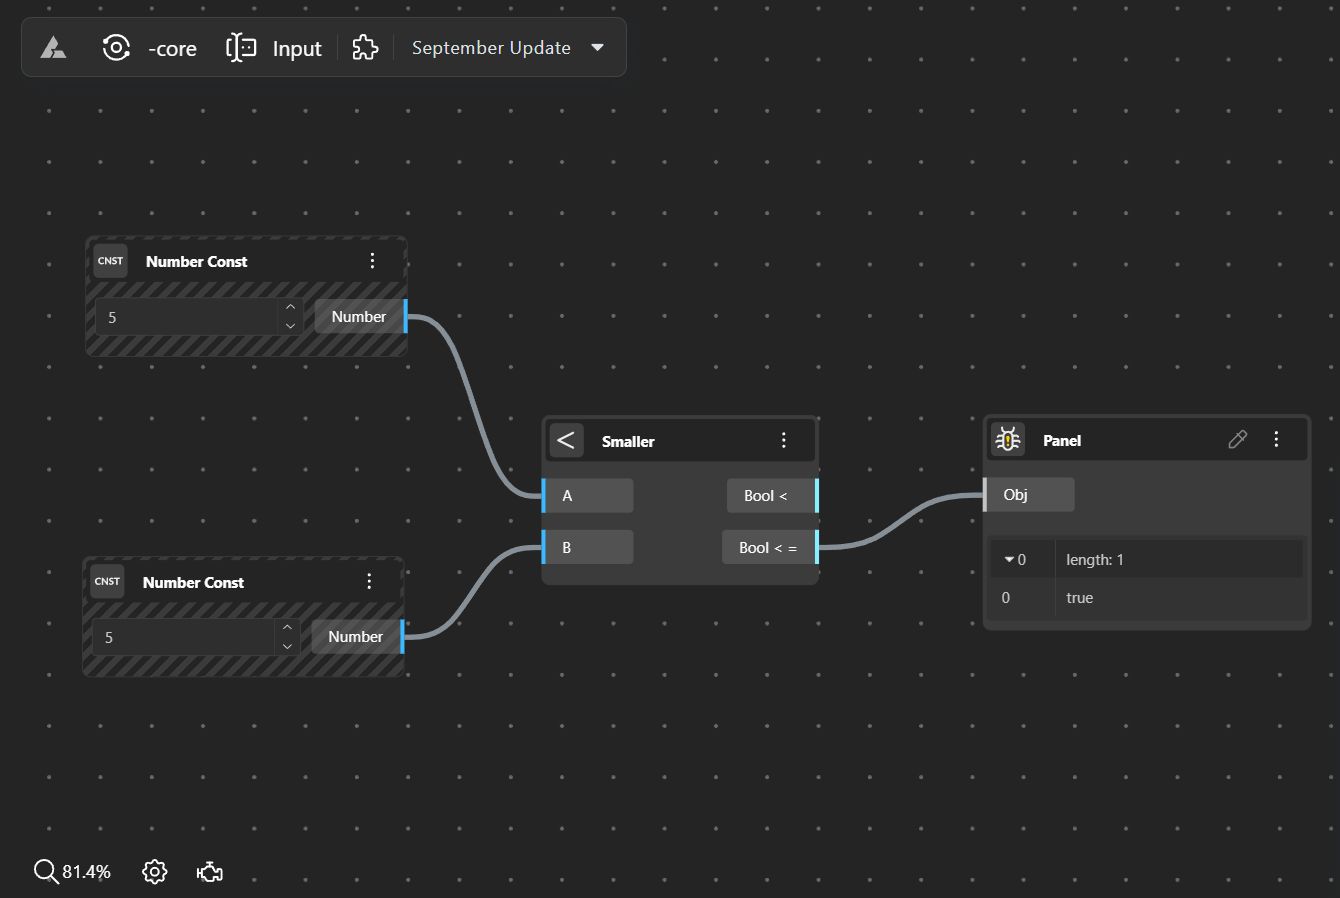
The “Smaller Than” node has been introduced to help you compare numerical values with ease. This node takes two input numbers and outputs two Boolean values, indicating whether each input is smaller than or equal to the other. It’s a simple yet powerful tool for decision-making processes within your projects.
12.”Equality” Node
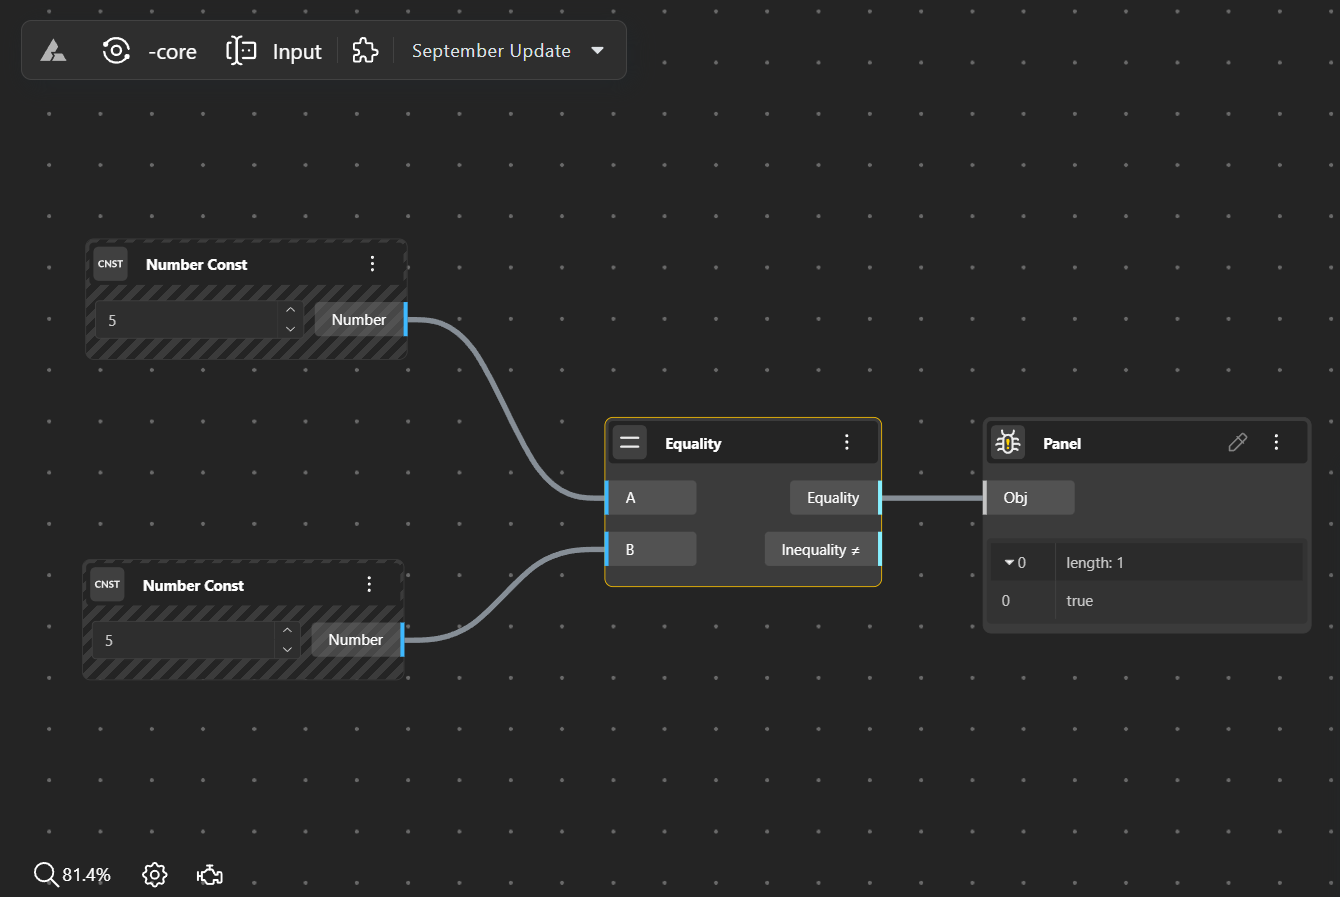
We’ve also added the “Equality” node, designed to compare two values and determine if they are equal. This node outputs a Boolean value, making it easier to create conditional statements and ensure your data aligns perfectly across your project.
13. “Tree Branch Maintain” Node
The “Tree Branch Maintain” node enhances the functionality of the traditional “Tree Branch” node by allowing you to input multiple paths. This makes it possible to manage several branches within a tree structure simultaneously. Additionally, with this node, you have the flexibility to either maintain the original path of the data or change it to a default path, such as 0.0, depending on your needs. This added control makes it ideal for handling more complex tree manipulations and managing list data efficiently.
14. Automatic Node Chooser
We’ve made node connections even more intuitive with the Automatic Node Chooser feature. Now, when you click and drag a line from an input or output port and release the left mouse button, a chooser dialog will automatically open. This dialog displays only the nodes that are compatible with the port you’re connecting, speeding up your workflow and reducing the chances of making incorrect connections.
15. Profile Picture Upload and Editing
Personalizing your profile just got better! You can now upload and edit your profile picture directly within the platform. Before uploading, you have the option to crop your picture to ensure it looks just right. This feature gives you more control over your personal branding and makes sure your profile reflects your best image.
16. Introducing the “Relay” Node
The “Relay” node is a new addition designed to enhance data management within your projects. Acting as an intermediary, the “Relay” node allows you to forward or pass data from one part of your system to another without altering the data itself. This is particularly useful in complex workflows where data needs to be redirected or transmitted to various outputs, ensuring that your data flows seamlessly through different stages of your project. Simply double click on the connecting wire, the relay node appears allowing you to use it as an intermediary node.
17. Picture-in-Picture (PIP) Mode

We’re introducing Picture-in-Picture (PIP) mode, a feature that allows you to view a smaller, secondary window displaying a selected part of your work or a related view while working in the main viewer. This is especially useful for multitasking, as you can keep an eye on a reference model, video feed, or another part of your project without losing focus on your main task. PIP mode is designed to boost productivity by giving you the flexibility to monitor different aspects of your work simultaneously.
18. Chatbot Support Update
We’re excited to introduce a new chatbot support feature, now available on every page via the support icon at the bottom right corner. With this feature, getting help has never been easier. Simply click the support icon, and you can quickly report issues, ask questions, or provide feedback. This integration is designed to give you instant access to assistance, ensuring that any concerns or issues are addressed promptly and efficiently.
In addition to these exciting new features, we’ve also focused on resolving numerous bugs and improving overall stability to ensure a smoother user experience. However, if you come across any issues or bugs while using the platform, we encourage you to report them. Your feedback helps us improve, and we’re committed to addressing and resolving any issues as quickly as possible. We’re excited to see how you’ll use these new features to push the boundaries of your projects.
Stay tuned for more updates, and as always, we’d love to hear your feedback!
Happy creating with Beegraphy!