Table of Contents
BeeGraphy: A Beginner’s Guide to Online Computational Design
The design world is evolving rapidly. Gone are the days when static drawings and complicated software installations were the norm. Now, computational design allows creators to use algorithms and parameters to craft intricate and dynamic models. Platforms like BeeGraphy are at the forefront of this revolution, making parametric modeling accessible to everyone—from design enthusiasts to professionals.
In this beginner’s guide, we’ll explore the fundamentals of computational design, how it differs from traditional methods, and how BeeGraphy provides an intuitive, online space to bring your parametric creations to life.
What is Computational Design?
At its core, computational design is the use of algorithms, data, and parameters to create design solutions. Unlike traditional design software, where you manually draw each element, computational design allows you to define rules and relationships that guide the behavior of your design elements. It’s a shift from manipulating shapes directly to giving the computer a set of instructions, resulting in more efficient and flexible workflows.
Imagine designing a simple rectangular wall. In a traditional CAD program, you’d draw the four lines manually, specifying their lengths. However, in a computational design environment, you would define the wall by its width, height, and thickness. Adjusting any of these parameters automatically updates the entire structure while maintaining its rectangular form. This concept can be expanded to complex projects, where computational design allows for dynamic variations, optimization, and even generative designs that evolve based on user inputs or specific constraints.
The Three Key Pillars of Computational Design
Computational design spans a variety of methodologies, but the three most important approaches for beginners are parametric design, generative design, and algorithmic design:
- Parametric Design: This is the most commonly used computational design technique. Designers define geometry by establishing relationships between parameters. Modifying one parameter (e.g., the height of a structure) will update all related geometries, allowing you to explore multiple variations of a design quickly and effectively.
- Generative Design: This takes things a step further by allowing algorithms to generate a range of design options based on specific goals or constraints. The designer provides the rules, and the computer generates different solutions that can then be evaluated for aesthetics, performance, or other criteria.
- Algorithmic Design: In this method, designers define explicit rules and processes through algorithms to automate certain design tasks. This can be useful for repetitive tasks or for generating designs that require mathematical precision.
These approaches are transforming industries such as architecture, product design, fashion, and even digital art. The flexibility and power of computational design enable creatives to push the boundaries of what’s possible, resulting in innovative, optimized, and personalized solutions.
Enter BeeGraphy: Your Online Gateway to Computational Design
BeeGraphy is a free, cloud-based platform that brings the power of computational design to your fingertips. Whether you’re a student, hobbyist, or professional designer, BeeGraphy’s intuitive interface allows you to create complex parametric models without the hassle of software installations or hardware limitations.
BeeGraphy offers a range of features designed to make computational design accessible:
- BeeGraphy Editor: This is where the magic happens. The editor is an interactive workspace where you create visual scripts, define parameters, and see your creations come to life in both 2D and 3D views. It’s like having a design studio in your browser, without any downloads required.
- BeeGraphy Market: If you’re looking for inspiration or want to share your own work, the BeeGraphy Market is the place to be. You can browse parametric models created by others, download free or paid designs, and contribute your own creations to the growing community.
- Educational Resources: Whether you’re just starting out or looking to sharpen your skills, BeeGraphy’s blog, tutorials, and FAQ section offer a wealth of knowledge. From basic guides to advanced techniques, you’ll find the support you need to enhance your design journey.
A Hands-On Guide to BeeGraphy: Your First Script
Now that you have a foundational understanding of computational design, let’s dive into BeeGraphy with a step-by-step tutorial. Follow these instructions to create your first parametric design using the BeeGraphy Editor.
1. Accessing the Editor
Start by heading to BeeGraphy.com. Sign in using your Google or Facebook account, or create a new account if you don’t have one. Once logged in, click on the “Editor” tab. You’ll be greeted with a blank canvas—your workspace for building computational models.

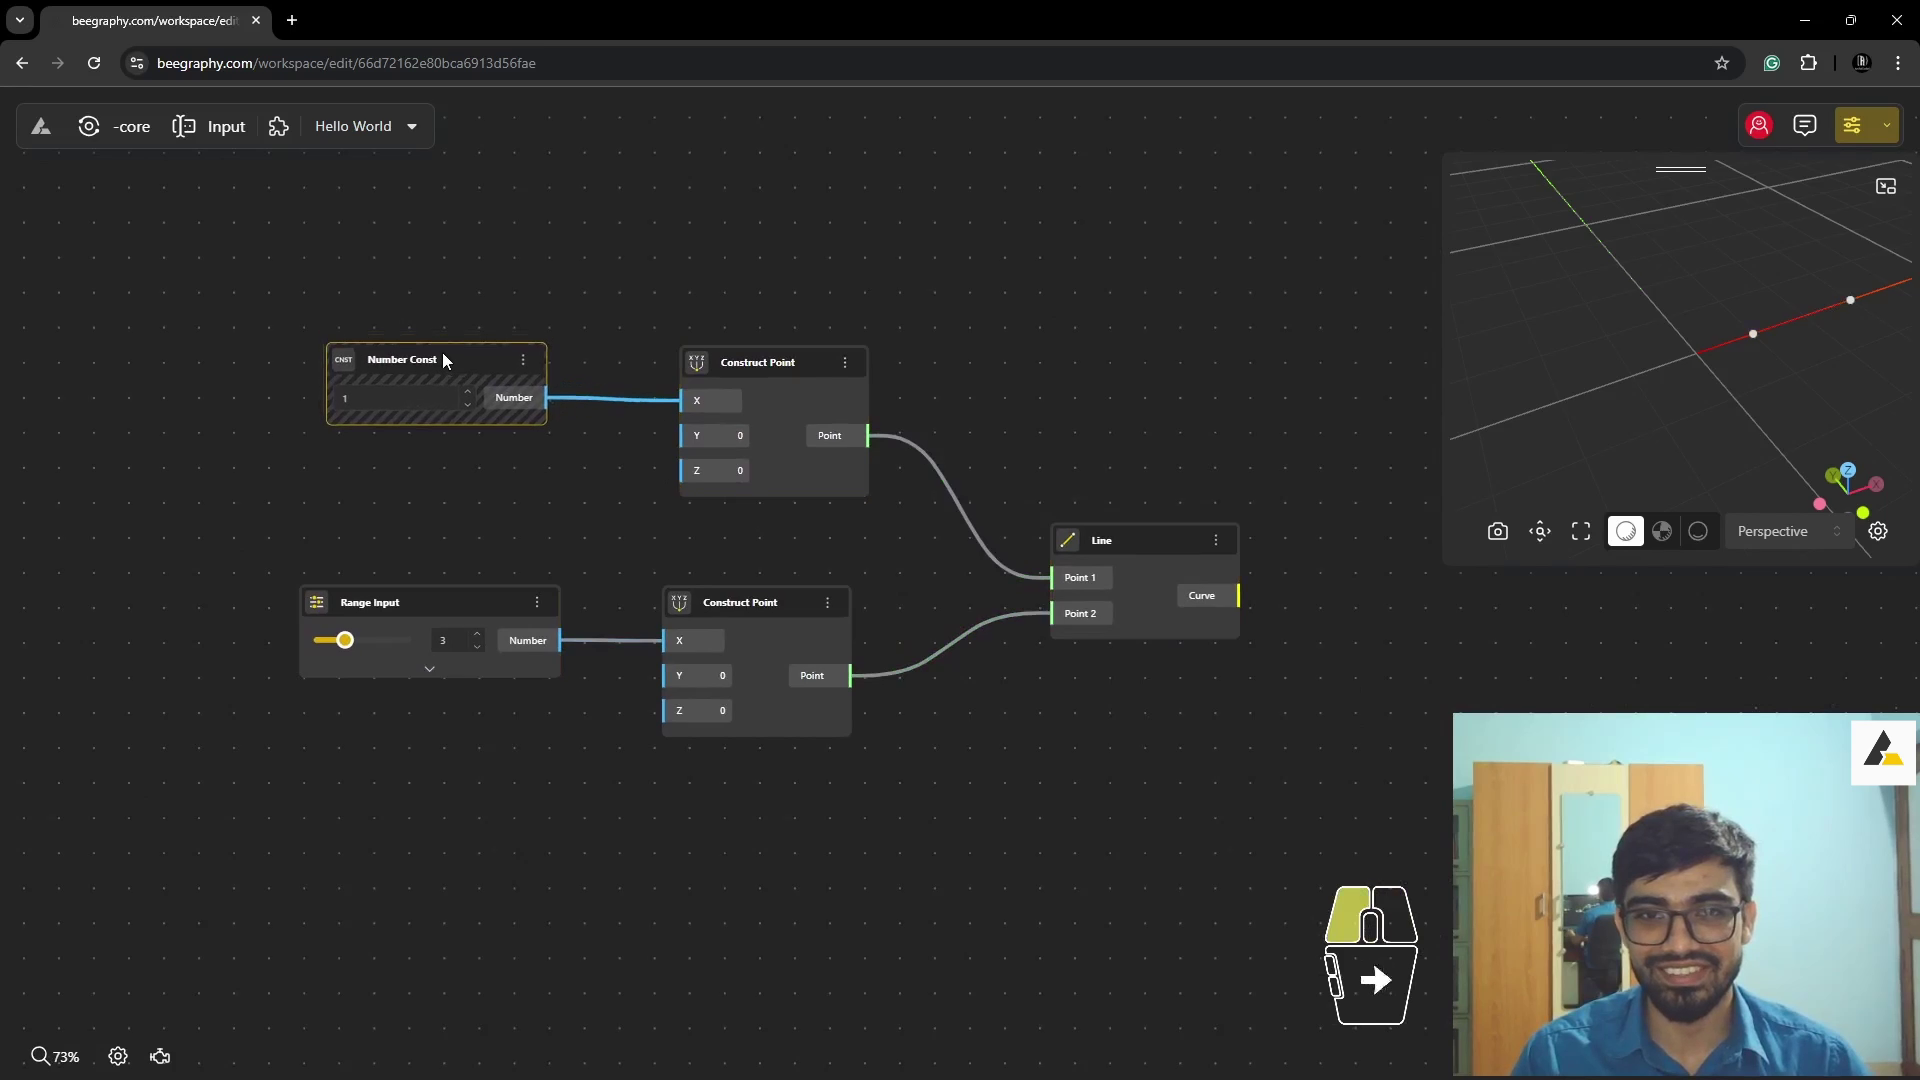
2. Constructing a Point
To begin, double-click anywhere on the canvas. This will open a search bar. Type “point” and select “Construct Point” from the dropdown menu. You’ve just created a point defined by its X, Y, and Z coordinates. This point represents a location in 3D space, and you can manipulate its position using parameters.
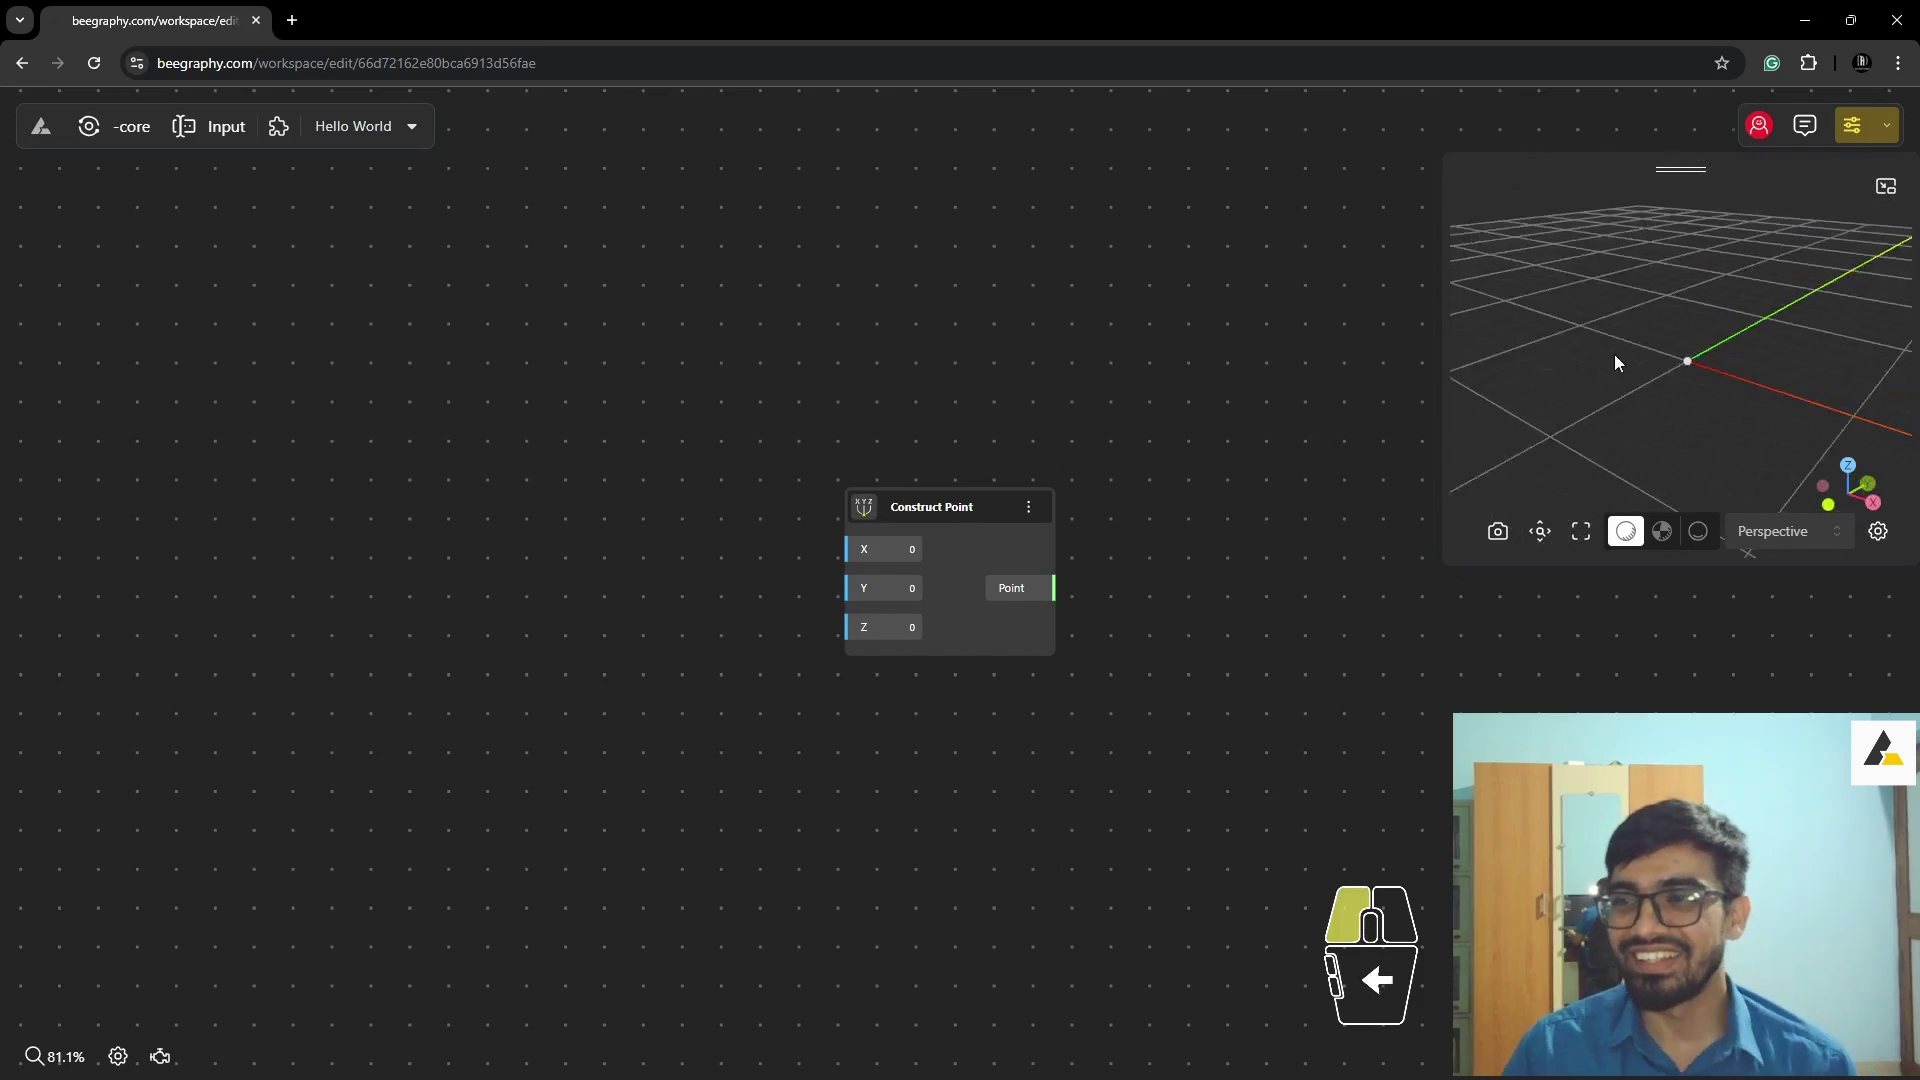
3. Understanding Nodes and Connections
Before proceeding, it’s essential to understand the basics of how the BeeGraphy Editor works:
- Nodes: These are the building blocks of your script. Each node represents a function or operation, such as creating a point or a curve.
- Inputs and Outputs: Each node has inputs on the left (data it requires) and outputs on the right (data it generates). You can connect nodes to pass information between them.
- Connections: These are the lines that link outputs to inputs, transferring data between nodes.
4. Defining Point Coordinates
Now, let’s give your point some coordinates:
- Hover over the X input of the “Construct Point” node, click, and type “1.” The point in the 3D viewer will move to position (1, 0, 0).
- Alternatively, you can use a “Number Const” node to define coordinates. Double-click the canvas, type “number”, and select “Number Const”. Connect the output of this node to the X input of your point node.
5. Creating a Second Point
You can easily create a second point by duplicating the “Construct Point” node. Press CTRL+C and CTRL+V to copy and paste. For more dynamic control, create a “Range Input” node by typing “range” into the search bar. This node allows you to control values using a slider.
6. Connecting the Points with a Line
Now, let’s create a line between the two points:
- Double-click the canvas and type “line”. Select “Line” from the options.
- Connect the two points to the “Point 1” and “Point 2” inputs of the line node. A straight line will appear in the 3D viewer.
7. Dynamically Control the Line
For real-time interaction, enable the “Live calculation” feature by clicking the gear icon in the top right corner. Adjust the sliders of the “Range Input” node, and watch as the line dynamically adapts to the new point positions.
Expanding Your Horizons: Beyond the Basics
This basic tutorial just scratches the surface of what you can achieve with BeeGraphy. The platform includes an extensive library of nodes that allow you to create more advanced geometries such as curves, surfaces, and solids. Whether you’re prototyping a new product or designing a building façade, BeeGraphy’s parametric tools provide the flexibility to explore, iterate, and optimize your designs with ease.
Why BeeGraphy is Perfect for Beginners
- No Installation Required: As a cloud-based platform, BeeGraphy eliminates the need for bulky software. Simply open your browser, and you’re ready to go.
- Real-Time Collaboration: BeeGraphy enables real-time collaboration, allowing teams to work on the same model simultaneously, regardless of location.
- Accessible to All Skill Levels: Whether you’re a beginner just starting out or a seasoned designer, BeeGraphy’s intuitive interface and robust resources make it easy to learn and master parametric design.
Key Takeaways
- Computational design allows for dynamic, rules-based creation, transforming how we approach design tasks.
- BeeGraphy is an accessible, online platform that democratizes parametric design, empowering anyone to explore this exciting field.
- The BeeGraphy Editor provides a visual scripting environment, perfect for both beginners and experienced designers.
- Parametric modeling enables real-time control over designs, fostering creativity and efficiency in your workflow.
Further Exploration
Ready to dive deeper? Explore BeeGraphy’s blog for more tutorials, or visit the BeeGraphy Market to download parametric models created by the community. Whether you’re looking for inspiration or guidance, BeeGraphy offers everything you need to expand your computational design skillset.