Now let’s get acquainted with the model settings
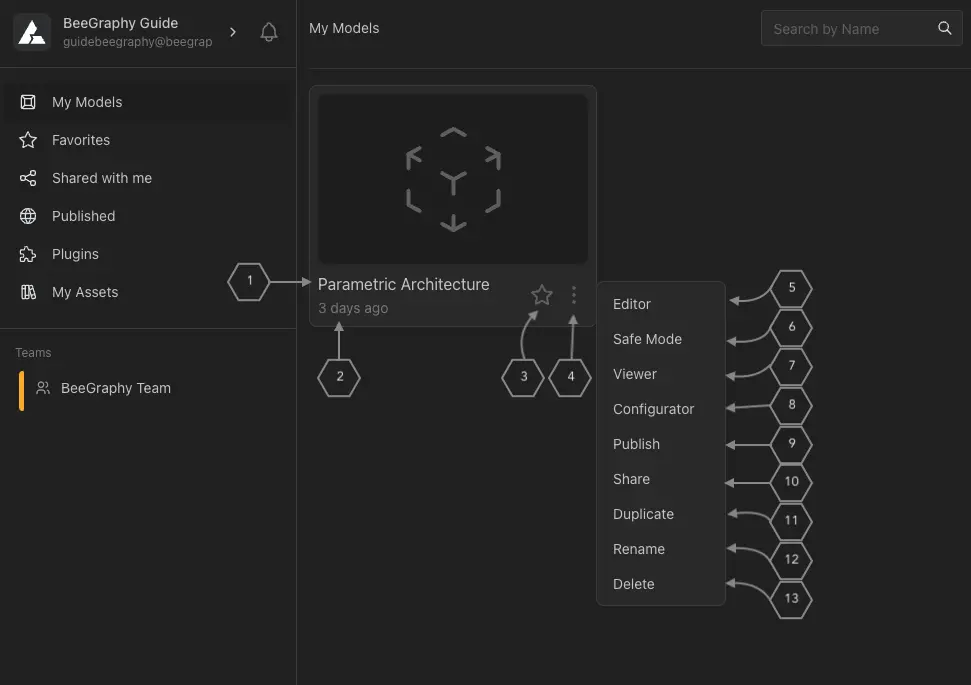
Model Name (1) distinguishes one model from another.
Below the name(2), you’ll find the time elapsed since the model’s creation.
Clicking on the star icon (3) adds the model to your Favorites section for quick access.
To access the model settings, click on the three dots (4) in the top right corner of the model. Let’s now explore each function in detail.
Editor (5): Launches the model in the Editor for making edits.
Safe Mode (6): Starts the Editor with the engine turned off for troubleshooting.
Viewer (7): Displays the model in a read-only Viewer mode.
Configurator (8): Allows customization of the model in Configurator mode.
Makes the model publicly available.
Publish(9)Share (10): Lets you share the model with other users.
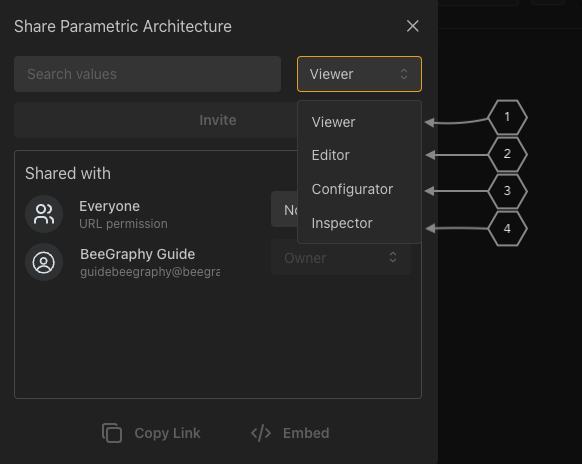
In the opened window, you need to fill in the email address of the recipient whom you want to grant access to the model. Next, it is necessary to select the permissions that the user will receive in connection with the model:
Viewer (1) - The recipient will only have the opportunity to view the model and change values.
Editor (2) - Ability to edit and modify the model.
Configurator (3) - In this case, there is an opportunity to edit the position and values of the input nodes, as well as the position of the model.
Inspector (3) - Ability to see nodes and the model in the Editor.
After performing the above actions, you should click the ’Invite’ button, and the user will see the given model in the ’Shared with me’ section.
The same action can be performed for people who have a link to this model, where you can also choose their permissions.
Duplicate (11): Creates a copy of the model after confirming in the opened window.
Rename (12): Updates the model’s name.
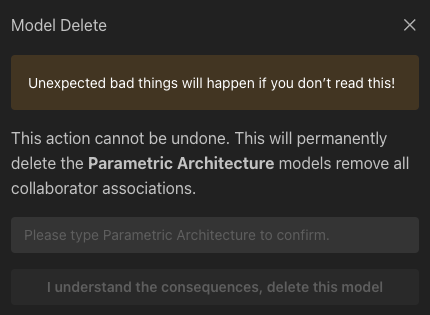
The ’Delete’ (13) button is designed to remove the model. Upon clicking it, a confirmation window will appear, requiring you to enter the name of the model for confirmation. Once confirmed, the deletion button will become active. After clicking it, the model will be permanently removed from the list.